
Over the bank holiday I went to a Back To The Future Party for my friend’s 30th birthday and it was brilliant! It’s a pretty genius theme as she was born in 1985 (the year of the first film) and turns 30 in 2015 (the year they go to in the future in the second film). You’ve got lots of eras and films to choose from and there were 80s people, 50s people, 2015 ‘future’ people and wild west people (from the 3rd film). It was brilliant.
Here is me and my friend, Chloe, recreating the iconic poster:
 I’m obviously wearing the wrong Doc costume, but you get the idea!
Can we just take a minute to appreciate the effort Chloe’s family put into the party? Her sister made the delorean:
 (That’s my friend James, a fellow/rival Doc sitting in the car)
And her dad made their Summer house look like the Court House by making a facade for it, with the clock stopped at the right time and everything!

There were also posters up everywhere, including ‘save the clock tower’ ones and the fax firing Marty from the second film. And themed cake toppers (I obviously had to have this one)! There was equal parts icing and cake, it was glorious!
So after doing some googling and re-watching the first film, I decided to go as Doc from the 50s, when Marty first knocks on Doc’s door after tracking him down in the 50s, having been accidentally sent back in time.
 I bought a pink shirt and white tie from my local charity shop – I was pretty lucky they had one of each in stock! Literally 10 minutes from my house, and it was under £5 for the 2 things! I already had some black trousers that I could wear, so the main issue was Doc’s actually quite amazing silver crocodile skin smoking jacket. Not sure if smoking jacket is the right term? Maybe it’s a dressing gown and men wore them over their clothes in the 50s? Any ideas?
Having scoured a few charity shops and ebay, I discovered it would be basically impossible to get one in time and not for, like £100. So I decided to make one. I say ‘make’ one – what I mean is buy a cheap dressing gown and make it look as much like his as possible. So I went to Primark – I know they’re evil, but I couldn’t afford to get a really expensive dressing gown to then potentially ruin it…..:(
So this was what they had:


 As you can see, it was only £8. Obviously I had to make it silver. I decided early on I would settle for grey as the range of fabric dyes out there is fairly limited, and I didn’t fancy trying to mix one myself! I bought Dylon’s pewter grey hand dye. This was my first time using a hand dye – I’d used one of the machine ones when I refashioned my peter pan collar dress. I found it quite easy, once I’d worked out the best receptacle to use would be the sink – I don’t own a bowl or bucket big enough for the amount of water needed. Also our silk is stainless steel, so staining was minimised!
Here’s the dye all swirling around:
And here’s the dressing gown in the dye: 
I left it for the full amount of time the packet recommended, which in retrospect was maybe a little long, but I was worried that there was too much fabric, so the shade would be light. Interestingly it didn’t dye evenly – there was a pattern in the weaving of the fabric and evidently some of the threads are more synthetic than others as they stayed white!
If you follow me on instagram, you’ll have seen this photo before, but I wanted to share it here too. This is what happens when you get a hole in your rubber gloves when hand-dyeing! It looks like a gross bruise and a broken finger, doesn’t it?!

This was the colour the dressing gown came out as once dry – it looks kind of silver, right? Not quite the same as Doc’s, but close enough for jazz, as they say.

My next job was to give the gown it’s black trims. I saw it had black on the collar, cuffs, and pockets in the film, so that’s what I did. I only took photos of the collar as the principle was the same for all the bits. The fabric is the left overs from my Black Victoria Blazer. The collar was 157cm on the gown, but I didn’t have a piece long enough for that, so I cut 2 pieces of 81cm each, giving me a 1cm seam allowance and some extra on the ends to tuck under to make it all neat and enclosed. The collar on the gown was 4.5cm wide, so I cut my strips 8.5cm wide, to give me 2cm on each side to turn under. I kind of thought of it as like giant bias binding, but without the centre fold, if that makes sense?
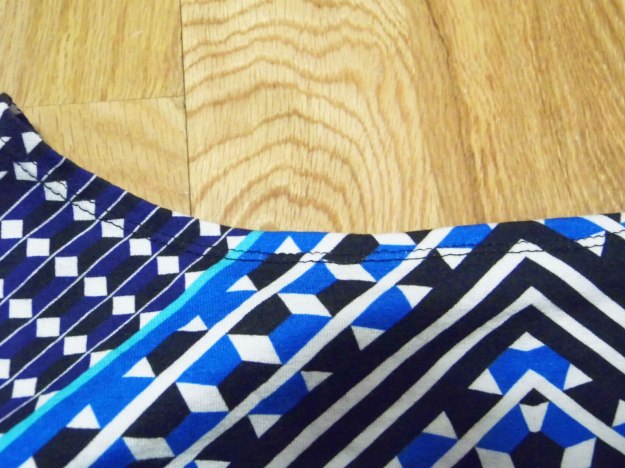
I lined up the seam on my collar with the seam on the original collar:
 Then just topstitched both sides, using a zipper foot on the side with the piping and a normal foot on the edge side.
 I didn’t realise I took, like, no pictures of the rest of the sewing – I think it’s because I was rushing to get it done the day before the party! One thing I forgot on the list before was that I made a new waist tie for the gown – I did dye the original one grey, but Doc’s is black. This was pretty easy. I cut 1 piece of fabric 132cm long, which was slightly shorter than the tie that came with it, but that was the maximum length I could get from my fabric. It was 12cm wide so I folded it in half lengthwise and sewed it with a 1.5cm seam allowance, then turned it through so the seam was on the inside. I then tucked in the ends and topstitched 1.5cm from the edge all the way around.
The top pocket it just a piece of fabric topstitched on – i didn’t write down the dimensions, but I kind of placed a rectangle where I wanted it and trimmed it down when it was a bit too long. The other pockets I hand-sewed on, otherwise I would have had to sew the pockets shut and I needed them to be functional to keep my drawing of the flux capacitor in. I cut 2 pieces of fabric 16cm x 6cm as the part I wanted to cover was 13cm x 3cm – this gave me 1.5cm on each edge to turn under. I tucked in the edges the best I could and then handstitched it into place.
The final bit was the cuffs. These turned out to be a bit fiddly as I measured the circumference of the cuffs but then ended up with rings that were too wide, so I had to adjust it as I went along. I measured them as 37cm wide, so cut 2 pieces of 40cm x 10cm. The 10cm width was based on measuring how far up the sleeve I wanted the black to go and seeing it was about 6cm, then I had 2cm on each side to turn under. I also folded up the original hem of the sleeves by 2.5cm as Doc’s shirt sleeves stick out slightly past the end of his dressing gown sleeves. Once I’d pinned it all, I topstitched with a 1.5cm seam allowance around the top and bottom edge of the black strip.
This is what it looked like in the end:
 I’m pretty pleased with how it turned out – it didn’t look exactly like it, but it was a lot closer than when I started! Also, I’ve totally adopted this as my actual dressing gown and it’s ace!
The main thing to make with this costume, though, was the mind-reading machine Doc is wearing on his head. It’s the crowning glory – literally! (sorrynotsorry!) There are some tutorials online to make this out of actual metal and how to make it have actual lights that actually light up. I have 2 weeks to make this, however – despite the fact that the party was announced in January. I work to deadlines, what can I say?
 (I’d borrowed my friend’s wig in this picture – I should have bought one for myself!)
Having gone for a recce of my local poundland and cheap shops (you know, the ones that sell tupperware and pots and pans and diy stuff?), I realised it was definitely doable to make the helmet and to not break the bank. I had a think for a day and then went back to buy ALL THE THINGS!
 I had an old bike helmet, which I thought would work well as the base for the helmet – and it has the straps for under the chin already built in! I bought: 2 pool noodles (floating aids for swimming pools), though I only needed one in the end; some washing up sponges, 30 red pencils; red and green strimmer line (no idea what that is); 2 rolls of aluminium foil tape (I didn’t know this was a thing until I saw it in a shop!); some plastic plant label sticks, for plants; and some white plastic things called screw cup and cover nos 6 & 8 white.
I counted how many bits stick out of the helmet and I came up with 13 – 8 around the bottom, 4 half way at each ‘corner’ (front, back, left and right) and one right at the top, in the middle. Each sticky out bit needed 2 circles, one long and one short. I cut the pool noodle into lengths of 1 inch and 2 inches. I realised that they were too wide and had too big a hole though the centre, so I cut 4cm out of each circle and closed the gap with sellotape. I ended up with things that looked like this (13 of each size):
 Then I had to make them look metal. I used the aluminium tape and first did the ends of the 2inch length, snipping the bits that overhung the end to make sure they folded down nicely. I also cut where the hole was and folded the excess into the hole through the middle.
 I then covered the sides, which for the 2inch lengths was super easy as this was the exact width of the tape.
 The 2 inch length, I just covered one end with the aluminium tape as I wasn’t sure how I was going to attach them to the helmet, so I didn’t want to waste time covering things that didn’t need to be covered. But that’s exactly what I did! I decided the easiest way to get the pencils to stay in the short lengths was to use the off cuts of the sponge which I’d cut out to make the circles smaller to stuff the hole, holding the pencil in place.
 I cut down the pencils to 10.5cm, which was pretty much a guess based on holding the pieces together and seeing what looked about right! I made sure to use the part with the rubber on, with the rubber at the ‘top’.
 I then decided to recover the bottoms of the short lengths, to cover the hole and make sure the pencils weren’t going to fall through – I think this was the only bit where I essentially did something twice!
 This was the stuff I used for the ‘light’ part of the things (I don’t know what to call them apart from things – sorry if this is confusing!).
 I cut a little piece of the sponge for each of the 13 lights, measuring them against the hole through the middle of the noodle. I then scooped out some of the sponge in the middle of each one. I then slotted each 2 inch noodle onto the 1 inch noodle and pencil, then stuck a yellow drawing pin through the piece of sponge (so the pin sits in the bit I’d scooped out), and then stuck the pin into the rubber on the end of the pencil. I found that the 2 inch noodle stayed where it was because of the green bit on the sponge being less soft that the yellow bit – they kind of wedged into place. I didn’t take a picture at this stage unfortunately.
 The next thing to do was to make the cross shaped wire that goes around each light. I used the green strimmer wire and cut a length – I didn’t write down what length – and joined it into a ring with sellotape. It took a bit of trial and error to get the right size. I then pre-bent the wire like so:
 And used netting staples…..
 ……and pushed them into the top of the sponge to attach the wire in the right shape. I tested this on a trial noodle to make sure it wasn’t just going to wreck the whole thing! I tried to make all the bits as light as possible, so it would all hold up and hold it’s own weight, but I couldn’t think of/ find anything else to do this job but the metal netting staples.
Here is the whole ‘thing’ assembled: 
 You can’t see in these pictures, but I used the off cuts of noodle to fill around the pencil in the underneath of the 2inch lengths, to stop them wobbling around so much.
The next thing to do was to attach the ‘thing’s to the helmet. I had an old greaseproof paper box, which turned out to be perfect to make the struts around the helmet which the ‘things’ are attached to. I covered the cardboard in the same aluminium tape, and it looked pretty good if I say so myself!

I used little strips of the tape to attach the ‘things’ to the frame – you can see here there are strips each side of the pencil. I then covered any green that was left visible with little squares of tape – that took quite a long time, I can tell you! I could have maybe used wider strips of tape, then there wouldn’t have been so much visible green. Hindsight’s 20:20 as they say!

The last thing to do was to make the struts that go in between the ‘things’. I have to confess here that I ran out of time and didn’t do as many struts as are on the original helmet in the film. There are other blogs which explain the complicated pattern and shapes that go into this helmet. I decided to just to around the edge and then make 2 triangles, at the front and the back, to make it look vaguely right.
This is where the plant labels and screw cap and covers come in.

Luckily the plant labels were easy to cut with scissors so where I had a gap than was narrower than they were long, it was easy to shorten them. I laid one label on the sticky side of the aluminium tape, and then laid a screw cap and cover next to it, with the hole side sticking up.
 I then put another label alongside the first, covering the (i guess) cover side of the screw cap and cover like this:
 I then folded the tape over, snipping at either end of the labels – this gave me the ends to stick the strut on with. I then used another piece of tape over the top, cutting a hole for the loop, to stick it on more securely. The loops are for wire to go through. I used the red strimmer wire to make it look like the lights were wired in and stuff. At this point, it was midnight the night before the party and I had to be on a coach at 9am the next morning, so I’m afraid I didn’t take any pictures!
But here is the finished costume, complete with the cut on his head where he fell and then had the idea for the flux capacitor, and the drawing he made of the flux capacitor which he shows Marty when he’s trying to convince Doc he really is from the future.
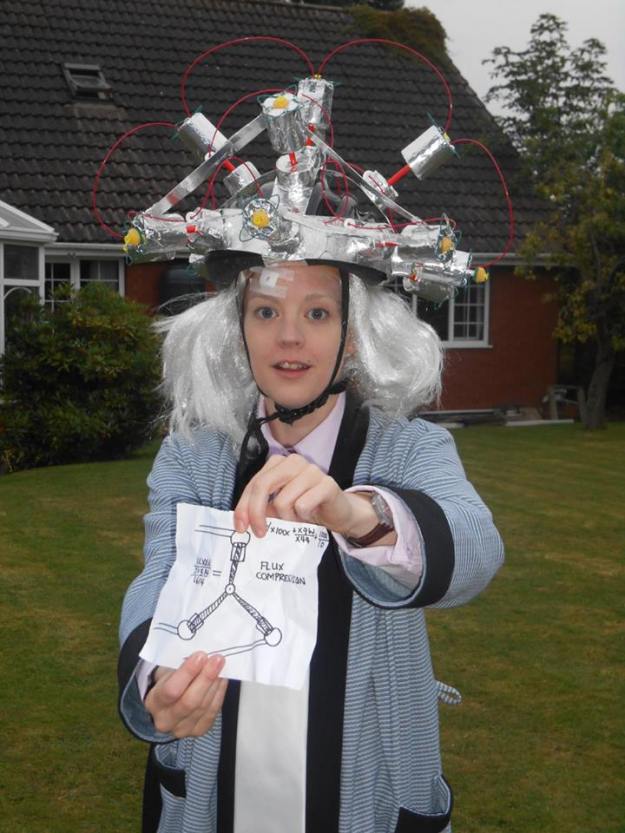
I really enjoyed making this costume, and it was great that everyone went to loads of effort for the party. I love costume parties!
p.s. Isn’t Back to the Future one of the best films? I hadn’t watched it in a while and then had to watch it for ‘research’ and I’d forgotten the beautiful love between Marty and Doc! It’s just a lovely friendship. I’m not saying the film couldn’t have done with more female characters, but I think Doc is my favourite anyway. I just need to work on making my eyes look really bulgey….


