I’m not sure why I didn’t blog this pair of corduroy dawns with the black pair, so here we are – with another, basically identical pair of trousers!
The fabric was also from Fabric Godmother, and I also made them over a year ago, last Jan/Feb kind of time.
I always make the size 4 in the dawns, and have to take a couple of extra cm off the back seam at the waist as I have a sway back. I also always make them with zips, instead of the button fly as I just prefer it. I do slightly wish I’d hemmed them a bit longer – at the time I was thinking slight shorter would look cool, but now I think a longer wide-legged trouser would be more my vibe (more on this later!). I’ll check how much of a hem I took up and maybe let them down a bit.
Since I made these, I have actually tried a new jeans pattern, and I’ve sewn some more smart trousers for work – though judging by my track record, you won’t get to see them for a year, lol!
I feel a little out of touch with the indie sewing pattern world at the moment, because I have the basics covered with patterns I like and have made a lot! The only designer I usually check out new releases for is Helen’s Closet. Have I missed any really great patterns recently? Or new pattern designers?
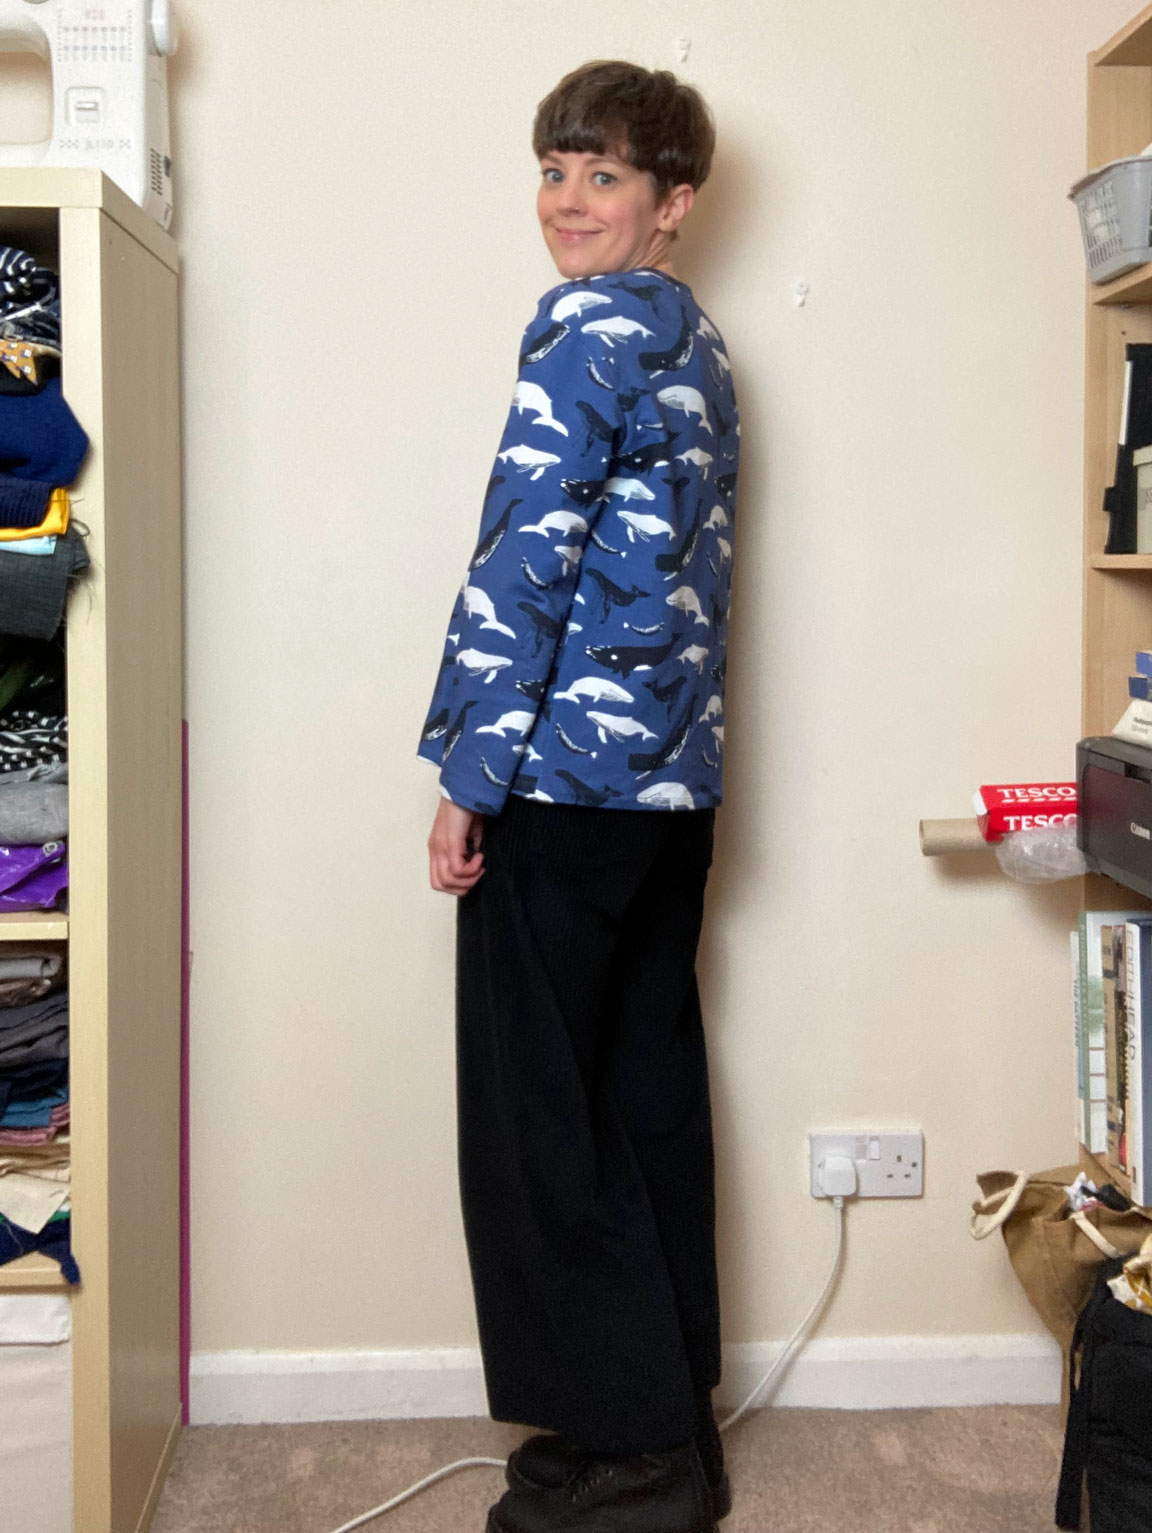
I’ve made quite a lot of Dawns so far (4 pairs of long jeans and 2 pairs of shorts I think) and I made 2 more almost a year ago (I’m behind with blogging, what can I say?!). This is the first of the 2 (though they’re both pretty much the same).
I made this pair in black corduroy (it’s quite a big whale) from Fabric Godmother. I bought the fabric at the same time as the fabric for my coat! I did sew it up pretty quickly, last February. And since I’ve made the Dawns quite a lot, there aren’t any steps any more that trip me up.
I always use zips instead of buttons as I personally prefer how it looks – no matter how carefully I’ve done button flies, they still gape! I also prefer wearing zips as I find them less annoying to undo/ do up.
As with all my other pairs, this is the size 4. I always have to take a wedge out of the back seam, I think around 2cm at the top, tapering to nothing by the time I get to the middle of the pockets. I always use my original pair to measure the pockets too – as I read somewhere early in my jeans making that pocket placement can make a difference to how your bum looks! I think I did take these in a little too much, though, as I find them uncomfortable to sit in all day at work (without undoing the button!). I often over-fit trousers and while I do test sitting in them, a short test is not enough to judge if they’re going to be too tight. I just need to give myself a little more ease in the future!
I’ve been pretty much living in this, and the other (navy) pair I made at work since I changed jobs in October. I have plans to make some more work trousers over the coming weeks because I’m getting a bit bored! My office isn’t super smart, so I can wear jeans, but I also have plans for some new jeans as I have definitely gone off wearing skinny jeans once and for all!
I am going to try some other trouser/jeans patterns but I do love the Dawns, especially this wide legged version. I do like the vibe. I’m finding I want less and less to show off the shape of my body, and gravitate towards oversized and loose-fitting clothes. Is that just getting older and giving less of a shit about what people think, do you think? I’ll be 40 at the end of the year and I just want to be comfortable and the right temperature, if possible!
You know you had a good time at an event when you literally take zero photos! Last weekend was my third time attending the ball (I missed it last year because I had 2 weddings and it felt like a bridge too far to also go to the ball!). You can see my previous outfits, from 2017 and 2019 here.
I did, however, take some photos of my outfit before I went. I went for a different vibe this year and made a suit with a cape, inspired by this outfit worn by Billy Porter, which I saw at an exhibition last year.
Obviously the embroidery was outside of my skills and time frame so I decided to get a brocade to kind of the same vibe. I also wanted to make a kind of see-through shirt, but decided against that because of modesty (and also time, again – I left starting the whole thing too late to be fiddling with difficult fabrics!
This is my whole outfit! I’m pretty please with how it all turned out.
The shirt is a classic Archer shirt. I’ve made this pattern so many times, it seemed an obvious choice. I made my standard size with no fitting adjustments, though I didn’t include any pockets. The fabric was not ideal for a shirt – it’s a crepe, so the shirt is quite bouncey and doesn’t press well. I chose it mostly because of the colour match with the brocade. Basically all the fabric is synthetic which is not what I usually want to do, but I had limited options and not much time left.
I’m not sure why, but the sleeves on the shirt were a bit long. Maybe the fabric just got kinda stretched out a bit. All the fabric except the brocade was from Masons in Abingdon by the way. They have a pretty big selection, but if you’re looking for very specific colours, as I was, then your options are limited.
The trousers are made from the brocade, obvs. The brocade was from Anglian Fashion Fabrics in Norwich – I saw it in person in July and regret not buying it at the time. I wanted to shop around for different options, but couldn’t find anything I liked more. Their delivery is not ideal and their customer service leaves a lot to be desired so I can’t honestly recommend them sadly.
The pattern I used for the trousers was Butterick B6878, which I used for my backless linen suit too. I don’t use big 4 patterns very often and always forget how minimal the instructions are! I also decided to leave the welt pockets off the back for time and the fabric pressed okay but not great (because it’s synthetic) so I thought trying to get welt pockets crisp would be tricky.
I made the size 10 and did have to take it in a bit on the back and side seams. I initially over-fitted it – I made the classic mistake of fitting it without the waistband, then added the waistband and it was too tight. I let the seams out again and cut a new waistband and they ended up really comfortable. I hemmed them considerably shorter than the pattern calls for as they were way too long.
Quite late on I had an inspired idea to make a bow tie! There are a bunch of free patterns and I kind of combined both. There are some that are adjustable but I didn’t have the hardware I needed so I made it a fixed size. I also had to watch a few youtube videos to learn how to tie it, lol.
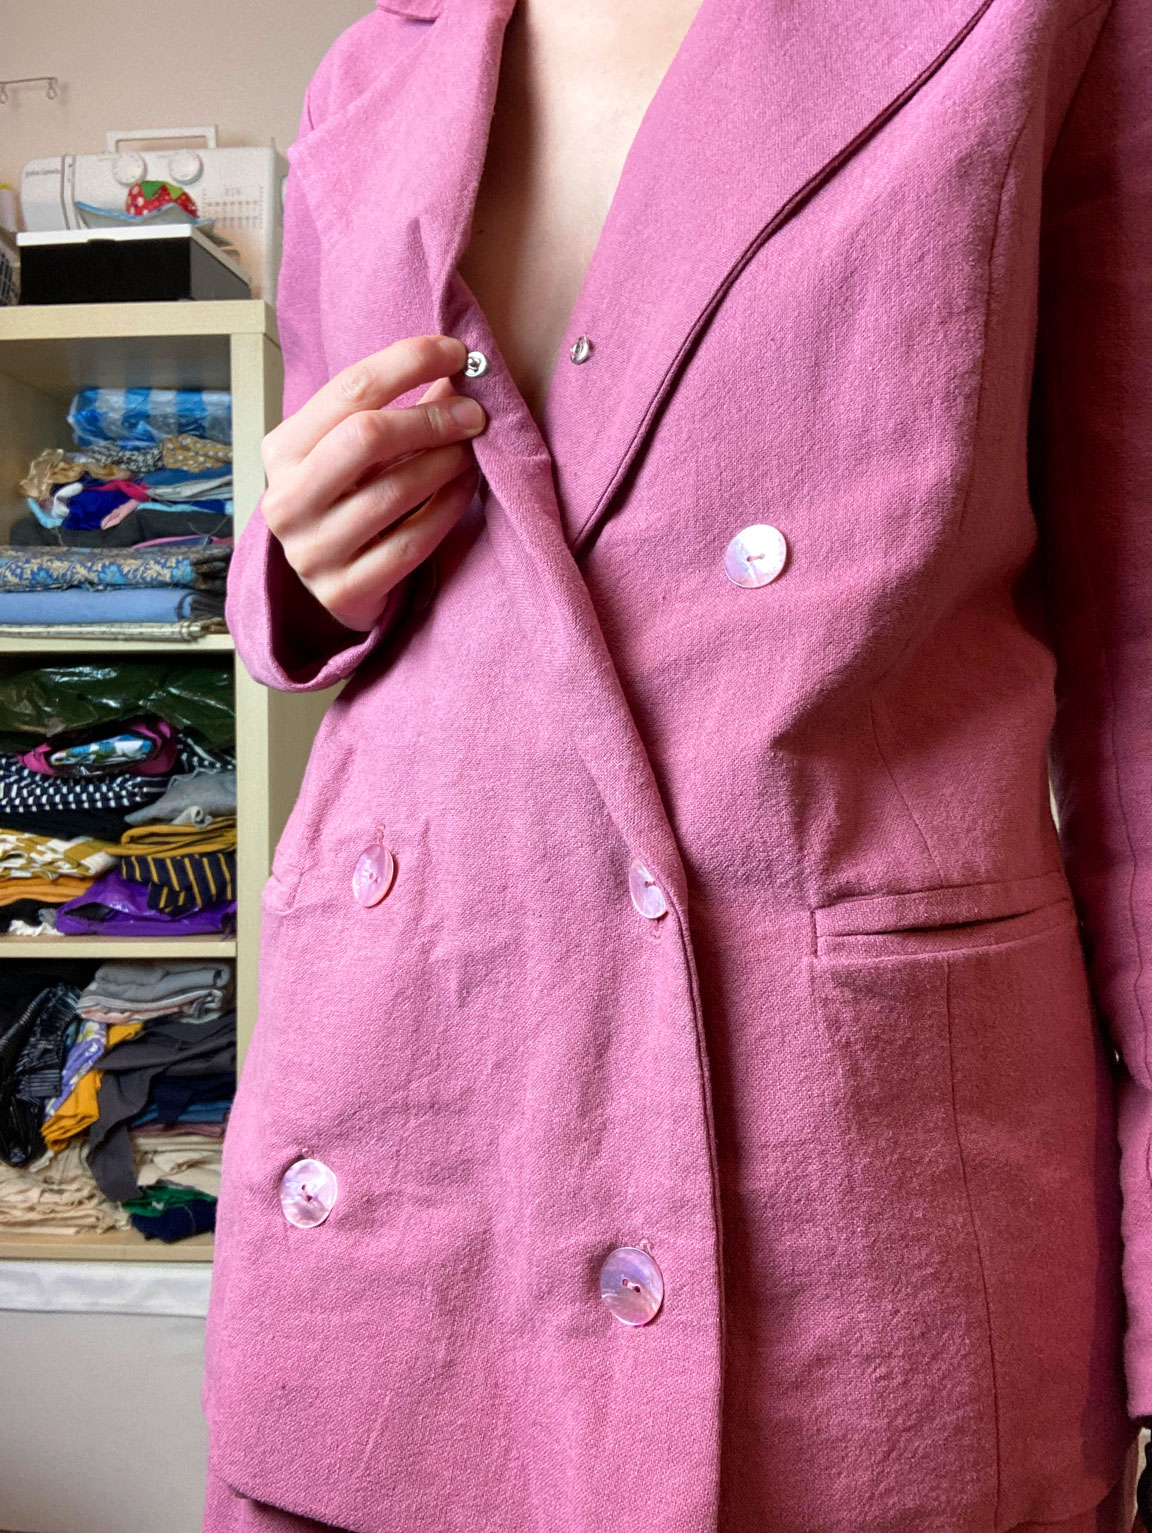
The jacket pattern I used was the Nina Lee Richmond blazer. I’ve made it once before. I made the size 8 both times, but I kind of knew it was a bit snug – but I was too lazy to reprint and reassemble it. The previous version never had a button so it didn’t matter that it was a bit snug over my hips. I made the jacket with no adjustments to begin with. Then after it was all finished, I unpicked the hem and let out the side and back seams out to 0.5cm instead of the standard 1.5cm from the waist downwards. This was enough to make it fit nicely around my hips!
You can kind of see from these photos that the fabric is not the nicest to press. I tried to press it nicely but synthetic fabrics, of course, don’t really hold a press. I top-stitched the whole front edge of the lapels so it would sit nicely.
I do really like the fit I achieved on the jacket (and trousers) and any outfit that has 4 pockets has got to be good – I didn’t need to take a bag, I could fit everything I needed in my pockets. I do really like the pockets on the Richmond blazer, and the instructions are really clear and easy to follow. The photographer at the ball asked if they were functional and I was like ‘of course!’. I guess she didn’t know how much sewists love a pocket!
And of course, the finishing item of the ensemble was the cape. I was worried I would feel too stupid to wear the cape, but it’s really fun to swish around in a cape! I used Simplicity 8721, which is like a costume cape pattern (which is kind of all you can get). I made it without the hood and lined it, to give the same surprise colour as the one Billy Porter wore.
It’s quite hard to capture the movement of the cape in photos. The 2 fabrics were really light weight, which was what I wanted to make sure it would have some movement.
I do love the bright pink lining – and the shoes were a flukey colour match since i ordered them online!
I really enjoyed making all of the items I wore – and I did have enough time to finish everything, not helped by the delayed fabric delivery though.
I went to the brunch the morning after the event and everyone was saying ‘so are you going next year?’ and I had so recently finished my outfit I couldn’t think of anything I would want to make/wear. But I have since had an idea so who knows…. And I would have almost a whole year to make my outfit (though I’m sure we all know I would still leave it to the last minute!).
It was really nice to meet so many new people – the sewing community is great that you can go to an event without knowing anyone and you can make friends by the end of the evening!
So a while ago I saw a photo of a Thai actor in the below outfit and immediately thought about recreating it. Last year I had 2 weddings to attend and for one I was going to wear my Mersis Dress which I made the previous Summer. But for the other one, I figured why not make a new outfit!?
You can see that the above outfit is more of a jumpsuit than separates – the front is one piece, but with suit vibes at the top. I decided I wanted to make separates – much more practical for ahem going to the bathroom (you don’t end up basically naked!).
I wanted the trousers to be what I consider stereotypical suit trousers, so with some pleats, welt pockets on the back and with front pockets. I came across Butterick B6878 and while the illustrations and photos on the pattern don’t make it look amazing, I did some googling and decided to go for it.
There are 2 darts on the back and 2 pleats on the front. I made the size 10 and actually can’t remember if I made any changes and didn’t write any notes – normally I write fitting notes as I go so if I make the pattern again, I’ll know what I did last time. There are shorts, tapered leg trousers and wide legged trousers. I went for the wide legged version.
I ended up making 4 welt pockets in total as the jacket also had 2 – though double welts rather than single welts. For those keeping count, I had a total of 6 pockets in my outfit! Winning!
Obviously sometimes you need sustenance while you’re sewing. IMHO you can’t beat a good cup of tea!
The jacket pattern I used was the Ready to Sew Joe Blazer. I used this pattern before for my pink smoking type jacket and since I’d already hacked it to kind of be double breasted, I thought it would be a good place to start. Oh, a word on the fabric. It was this lovely blush pink linen/cotton blend I bought from a fabric shop in Abingdon called Mason’s. They have 3 craft shops in total and are kind of legendary locally. I wasn’t sure what to expect but I was pleasantly surprised by their range of fabric and they have every notion you could think of.
Before when I hacked the pattern I pivoted the fronts to make them wider but this made them on an angle, so this time I toiled it a couple of times to figure out how best to do it and went with slashing and spreading (again can’t remember by how much sadly). You can see above I pinned a little wedge out of the front to make it even more straight, then sewed the facing to the front along that line from the inside.
Of course there was also a lot of hacking to the back. I merged the back side and centre back pieces into one and then cut a semi-circle out of the back, leaving a bit extra for seam allowance. It was definitely a head-scratcher to figure out the construction to make it all look neat, but I figured it out in the end.
↑ business in the front
↓ party in the back!
The loop at the top which holds the ‘strings’ was 20cm x 11cm and sewn in half with a 1.5cm seam allowance. The loops were 74cm, 128cm and 146cm long, though I did have to slightly adjust some of them so they weren’t too slack or too tight.
I did really love wearing this outfit to my friends’ wedding back in August but there was quite the heat wave that week so maybe it wasn’t the most sensible choice! I was more than a little warm. I did take a t-shirt to change into in case I couldn’t cope with wearing the jacket and once I started dancing to the live band, I did admit defeat sadly.
Not to blow my own trumpet but I am really quite pleased with how the back in particular turned out, but also managing to make it actually look like a double breasted suit on the front – though the bottom set of buttons looks a little low proportionally, looking at these photos. Eh, the sewist’s curse, to always look for flaws that literally no-one else would ever notice!
While I may not get the chance to wear the whole outfit very often, I am definitely planning to wear the trousers with some other tops. And actually as part of Wear It On Wednesday I have already worn them once – I think when the weather gets a bit warmer they’ll get more into regular rotation!
To preserve my modesty I did add a popper to the front to make sure the lapels didn’t gape and show everything! As I’m sure you can appreciate I couldn’t wear anything underneath the jacket!
I did ask one of my friends to take a few photos of my outfit on the day. You can almost feel how hot it was in the photos – so sunny! I love hot weather but this outfit was not the best choice and I didn’t take any alternatives. Clever me!
I really enjoyed trying to recreate an outfit from photos I found online. I’ve done it a couple of times before (both outfits I wore to the dressmaker’s ball were red carpet copies [1 and 2]) but I definitely want to do some more of it. I just need some occasions to wear some more formal outfits…
Today I’m sharing with you my final pair of Arden Pants I made over the Summer. I think I’m done (for now) making Ardens, but I’m definitely not saying never again, since I love wearing them and if I find some great fabrics in the future I would definitely make some more. Anyway, here is the final pair. I made a YouTube video of me making them so if you’re scared to tackle this pattern (though you shouldn’t be as the instructions are excellent), then you can sew along with me.
Here are a whole bunch of photos! I made the size 6, as with all my other pairs, with a 6cm hem and no other changes.