Tag Archives: Simplicity 1696

Black Simplicity Trousers

After making my first pair of Simplicity 1696 trousers last April, I finally got around to making my second pair – or third if you count the pair I refashioned from my dad’s suit. I’ve worn these loads already, since making them back in May.

I made them in the same size as last time and made some of the same adjustments I made last time, namely to take in the legs on the outside seam. Last time I took them in on the inside leg seam too, but this time I didn’t. I’m happy to have a quite loose pair of trousers in this heat wave we’re having in the UK!

They do look a bit loose around the crotch area, but I’m not particularly bothered. I did actually completely finish these and then I unpicked the waistband and took them in a little more than I had before that. They were sitting too low on my hips, so the crotch was even lower and it bothered me too much. Usually once I’ve finished something, I can’t be bothered to fix things, but I did this time and I’m so pleased I did!

I left off the fake welt pockets on the back of this pair because they don’t serve any purpose and they don’t look great because I didn’t do them very well!

The fabric is some black twill I bought in Birmingham a year ago when I went for a meet-up with some Bristol-based sewing buddies. I initially bought it with a 60’s style dress in mind but I figured trousers would get more wear so I took the plunge and cut it up. And it’s not like black twill is difficult to find if I ever get around to making the dress!

This is my kind of outtake from this photoshoot – which is the result of me not quite getting into the shot after setting off my timer!

I don’t really have too much to say about these trousers except that I love them and have worn them multiple times per week since finishing them! I could do with another pair or two of good trousers to give myself more choice than just ‘navy or black’, though that’s pretty much always been the case for me!

Next time I share some trousers, I’m sure I’ll make them from a different pattern so I might have more to say!


Me Made May 2018 Round-Up

Now that May is well and truly over, I thought I’d do a recap of Me Made May. You can see my pledge here.

My main take-away is that I failed to make jeans. What a surprise. I’ve been saying I’m going to make jeans for 2 months (plus about a year before that!). I have a free weekend in a couple of weeks and it is my plan to make some jeans then – I wasn’t in the mood to make them on either of the bank holiday weekends in May as it was so bloody hot! The last thing I wanted to be doing was wrestling denim through my sewing machine.

I also found it pretty hard to decide what to wear as the weather was all over the place. I know it’s very british and boring to talk about the weather, but on the first bank holiday Monday when I was playing out with the brass band, it was 28 C and then there were other days that were 14 C.

I documented my outfits daily on Instagram and after a couple of days I decided to add another dimension to my challenge and try to have my photos look different from each other. This was kind of fun for the first week and then I just got even more fed up with documenting my outfits than in previous years because I then felt I had to think of somewhere new or a new pose for the photo. It was supposed to be a fun thing to try to break me out of my rut of the same few poses, but it didn’t really work out that way. I did, however, post as many outtakes as I could. It makes me laugh to see the stupid photos that The Boyfriend (who was a very patient Instagram Husband through the month) accidentally took. This might be the last year I take daily photos as it’s the least fun part for me, so I might try a different way of documenting my outfits so I can continue to scrutinise my wardrobe and plan my makes accordingly.

Here is a recap of all my outfits:


Day 1: silver toaster sweater
and navy simplicity trousers


Day 2: refashioned suit trousers
and gifted cashmere jumper


Day 3: mustard corduroy skirt
and thrifted navy spotty shirt

Day 4: flowery archer shirt and
black corduroy simplicity skirt

Day 5: electric blue coco top
and navy simplicity trousers

Day 6: yellow flowery plantain
tee and refashioned trousers

Day 7 part 1: white archer shirt
and black simplicity trousers

Day 7 part 2: yellow and navy
flowery sallie maxi dress

Day 8: refashioned raglan top
and black simplicity trousers

Day 9: spotty rushcutter
and freemantle coat

Day 10: refashioned coral, navy
and mustard dress into shirt

Day 11 & 12: spotty melilot shirt
and black simplicity trousers

Day 13: silver toaster sweater
and black simplicity trousers

Day 14: greyish melilot shirt and
navy simplicity trousers

Day 15: breton plantain tee and
navy simplicity trousers

Day 17: electric blue jersey
dress

Day 18: tester honeycomb
shirt

Day 19: refashioned coral, navy
and mustard dress into shirt

Day 20: white archer shirt
and black simplicity trousers

Day 21: navy and white
marianne dress

Day 22: stripey cropped inari tee
and refashioned trousers

Day 23: greyish melilot shirt
and navy simplicity trousers

Day 24: mustard astoria top and
refashioned suit trousers

Day 25: black simplicity skirt
and thrifted jumper

Day 26 & 27: navy simplicity
trousers and gifted top

Day 28: navy simplicity trousers
and spotty thrifted shirt

Day 29: spotty meilot and
mustard denim cleo

Day 30: mustard refashioned
skirt and thrifted shirt

Day 31: mustard astoria and
navy corduroy cleo

What I’ve learned about my handmade wardrobe:

  1. I need more trousers! I wore the same 2 pairs most of the month in rotation, and the suit trousers a couple of times.
  2. All of my knitwear is still ready to wear and I’m okay with that. I don’t have time to knit myself new things and most of the cardigans are still wearable so it seems not very eco-friendly to replace them all for the sake of having a 100% handmade wardrobe. I will make replacements as and when they wear out, but it’s not desperate.
  3. One of my favourite things in my wardrobe is my navy with white spots shirt (as you can see in Day 30) and it was from a charity shop. I think this is a good way to add to my wardrobe with things I wouldn’t necessarily make or things that I just like.
  4. I re-wore a few things that I had forgotten about, like the mustard corduroy skirt refashion.
  5. I didn’t get to wear a few things I really like because it wasn’t warm enough on enough days. I’m particularly sad my 2 In The Folds Collins Tops didn’t make it, but apparently the UK is going to have a 3-month heatwave so I’m sure they’ll get some wear this year.
  6. Most of my outfits fitted into the colour palette I decided I wanted to wear when I did the Wardrobe Architect last year, which is pretty cool. It is definitely easier to put together outfits when you like all the colours and they go with each other. The 2 cleos I made are definitely going to be a great addition to my wardrobe and fit into my palette. I’ve tried to be more focussed when buying fabric, and I guess it’s working!

What did you learn from Me Made May?

March Make and April Plans

March was definitely a light sewing month for me, despite the Easter long weekend we just had. I think since making my coat (which I still love so much I slightly don’t want it to warm up so I can keep wearing it!), my sew-jo has dissipated a bit. I’m not sure why, but I’m hoping it comes back soon.

The only item I made was this Kalle shirt, with the hidden button placket. I intended to get it finished in time for the Sew My Style deadline, which I think was the 25th, but it still doesn’t have buttons (but it counts as a finished make as the buttons will take me, like, 10 minutes).

My first make of April will hopefully be another paid of the Simplicity 1696 trousers which I made in navy blue last year.  I wear them all the time and could really do with a black pair. I bought some black twill last year during one of my fabric shopping trips to Birmingham. I originally had another plan for the fabric but trousers will be a more useful addition to my wardrobe.

It’s hopefully going to be trousers month in Machinations towers so my other main plan is to finally make a start on jeans. When I made my plans for the year, I planned one of my make nine or the three Sew My Style for each month and April and May are for the 2 Closet Case Patterns jeans patterns. I think I’ll start with the Morgans as they aren’t as fitted, but are presumably drafted using the same block so I’ll know which adjustments I’ll need to make to the Gingers to get them to fit. I still need to prepare both patterns but I’m hopeful I’ll have some jeans by the end of the month.

If I have time (which seems very. very unlikely) I’m still planning to make some Carolyn Pyjamas.

In other blog news, for the last year or two I’ve been trying to blog twice a week, though if you check the dates I publish posts, you’ll see I almost never achieved it and then I felt bad about missing my own schedule. So I’ve decided to write one post a week – with an additional one here and there if I have lots to share, though with my current sewing output, this seems unlikely!


Review of 2017

As this year approaches its end I (like many other sewists and bloggers) thought it would be fun to look back and see what I achieved sewing-wise.

The main part of my planning for this year had been my #2017MakeNine but I only managed to make 4 of the 9 patterns I had planned to make.

To slightly defend myself (against who?!) I did make 3 of the 4 patterns twice. (For all the makes below, click on the photo to be taken to the full blog post).

I made 2 Marianne Dresses and I love them both – both are from quite light weight jersey so they’re not the best for the cold weather we’ve been having in the UK recently.

I also make 2 Moneta dresses, though I don’t really wear the first one because I stretched out the neckline while making it.

I also make 2 Inari Tees, and I have a dress version cut out ready for next Summer – I didn’t get around to making it last Summer as it didn’t seem to last long enough!

The other make I managed from my Make Nine was my Roberts Collection dungaree dress. I did want to make the dungaree version as well but I didn’t get around to it.

I bought denim to make both pairs of jeans back in April but I didn’t quite get around to making them. I also have 2 fabrics to make the Carolyn Pyjamas from so I think I’ll bump them onto next year’s list too.

I also had joined the #SewMyStyle project and although I knew at the outset that I wasn’t going to make all 12 garments throughout the year, I only managed one – the Toaster Sweater, which I think was the pattern from January (though I’m pretty sure I made it late).

Although I didn’t make loads of the things I had planned at the beginning of the year, I did make quite a few things in the last 12 months.

I made a few presents and non-clothes, including 2 pyjama cases (a monkey and a penguin), a sack for work, a tailor’s ham and sausage (stuffed with fabric scraps), and a moomin embroidery (which helped me realise I actually quite enjoy embroidery).

I managed to refashion 3 garments: a simple tee refashion, my Christmas Party Dress and – the one I’m probably most proud of – I refashioned one of my dad’s suits into a suit for me.

In terms of sewing from scratch, this year I made:

  • 8 dresses
  • 1 pair of trousers and one pair of culottes
  • 2 skirts
  • 8 tops
  • 1 pair of shoes

The shoes were definitely a highlight! And after listening to Jasika’s episode of the Love to Sew Podcast, I feel inspired to make more shoes!

I am also proud of having made trousers for the first time! Shame I didn’t parley this into making more pairs of trousers as they are the thing that is really lacking in my wardrobe now.

These trousers are probably my most worn make of the year, but also getting honorable mentions are my stripey jersey dress which I’ve worn loads considering it was a late-in-the-year make.

I’ve also worn my grey-blue melilot shirt loads this year, so I definitely have more planned.

I feel like I can’t do a round up of the year without mentioning my Dressmakers’ Ball dress – ooh, I’ve just realised I made an extra pair of trousers than I listed above because my dress had trousers underneath! It was definitely one of my favourite makes from the year and it was fun to do some – very basic – drafting to alter the Emery dress to make the copy of the Emma Watson outfit I liked so much.

There were some other things that I mentioned I wanted to do in 2017, like make a quilt, re-upholster a chair and make a wall hanging. I did none of these things. I did, however, complete the Wardrobe Architect project and I do think this helped me to focus my sewing and fabric buying.

Obviously on a personal level, 2017 wasn’t the best – and 2016 sucked too – so here’s hoping 2018 isn’t quite so crap and I have no family sadnesses.

Did you meet your goals in 2017? Are you rolling some of them into 2018 if not? I will – I think some of my #2018MakeNine will be the ones I didn’t make in 2017!

Refashioners: making a suit…..into a suit

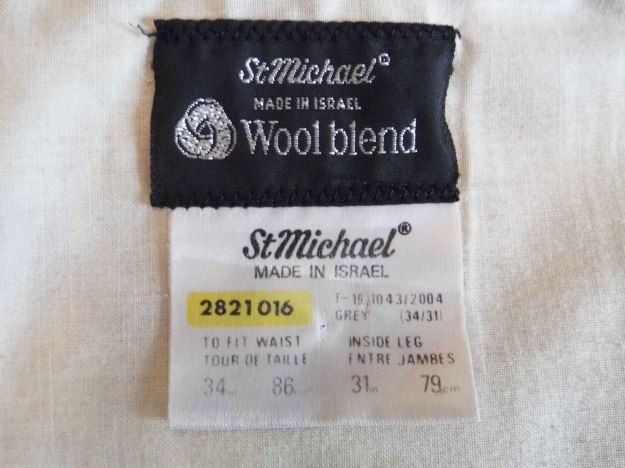
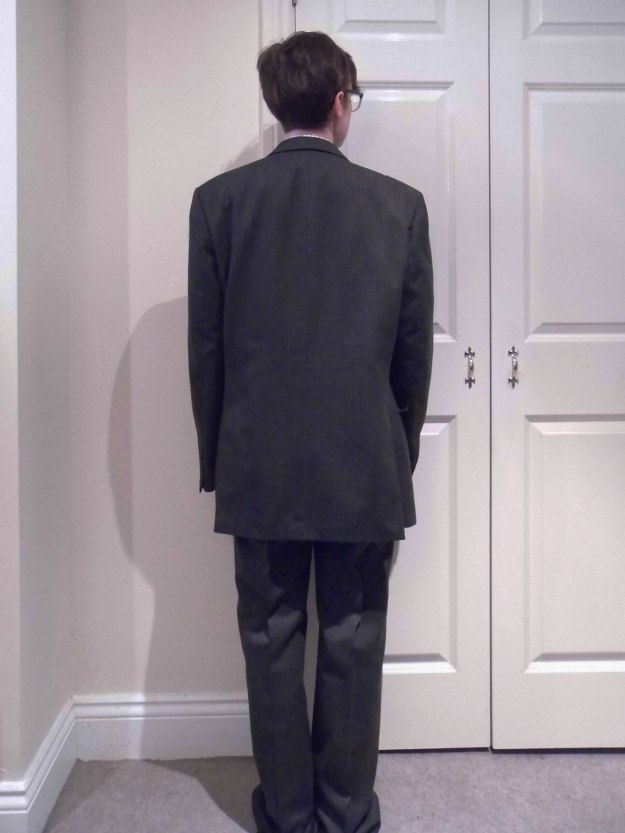
As I mentioned in my October makes post, one of the makes that took up quite a lot of time was my suit refashion, which is my entry for the Refashioners 2017. I joined in 2 years ago and refashioned 2 men’s shirts (1 & 2) and wanted to join in last year but family events took over and I didn’t get around to it, so I was very keen to take part this year. When I was at home in August, I suddenly had the thought that it would be nice to use one of my dad’s suits rather than a random suit from a charity shop (though perhaps I would have been more adventurous if the suit had been more anonymous?!) so I asked my mum if she still had any of my dad’s suits (he was in a care home at this point). She had one still in the wardrobe – she had got rid of most of them quite a few years ago, when he stopped having a job that required wearing a suit every day. It was a St Micheal’s one (which I think is a Marks and Spencers brand) and it was apparently made in Israel.


Although my Dad had been ill for a long time – he had a rare degenerative brain disease called Corticobasal Degeneration (CBD) for quite a few years, I obviously did not think that by the time I refashioned the suit he would no longer be with us. So this refashion became even more poignant to me than it would have been. I’m a little sad that he won’t see me wearing his suit, but c’est la vie.

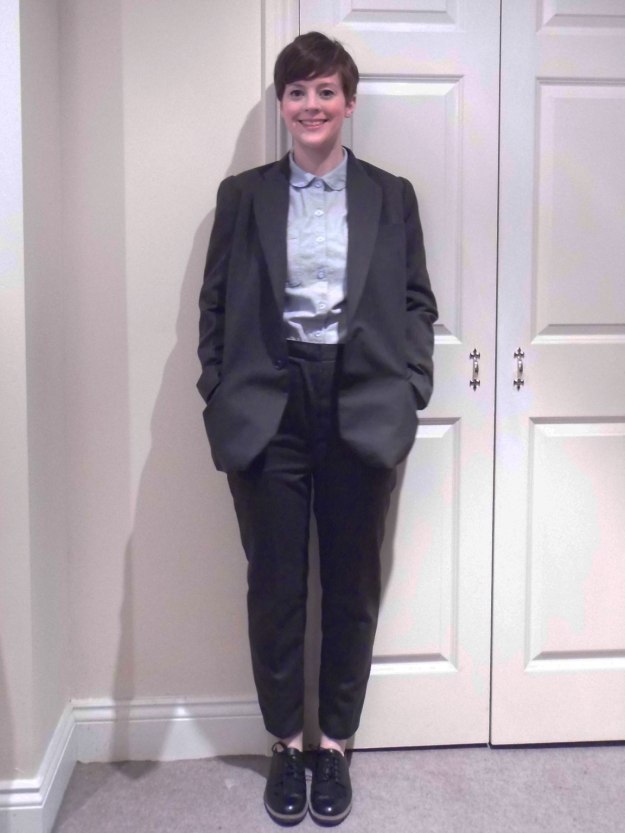
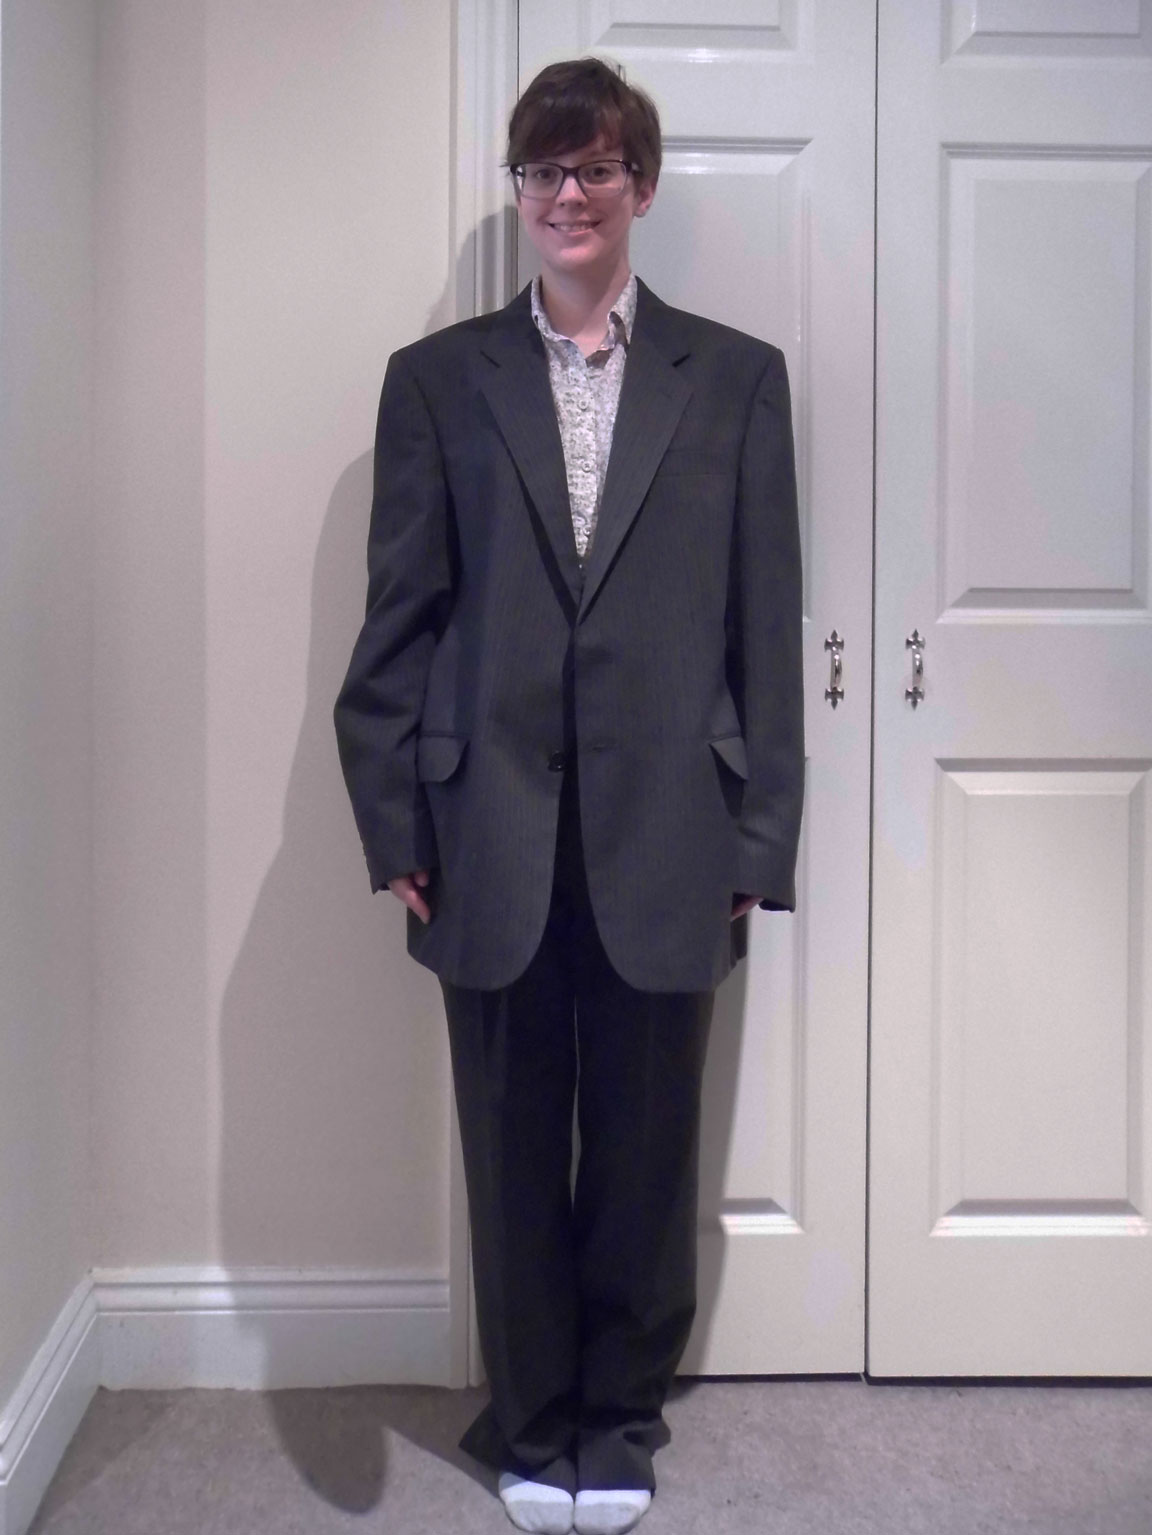
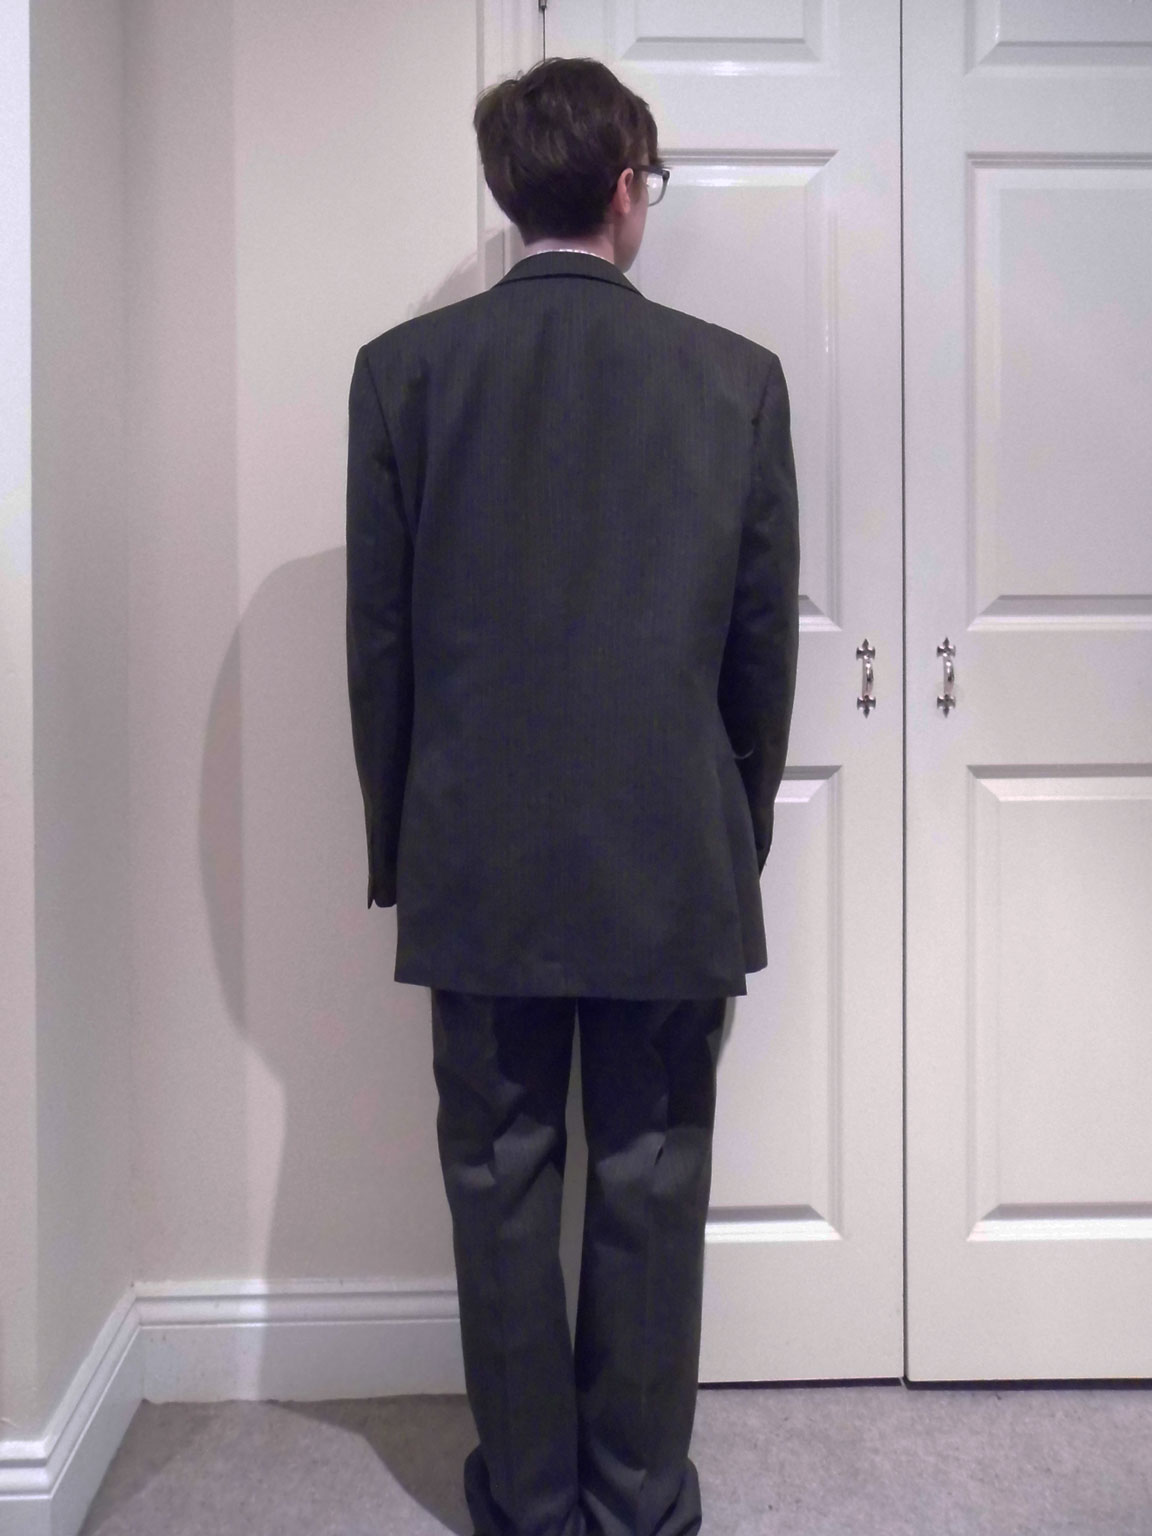
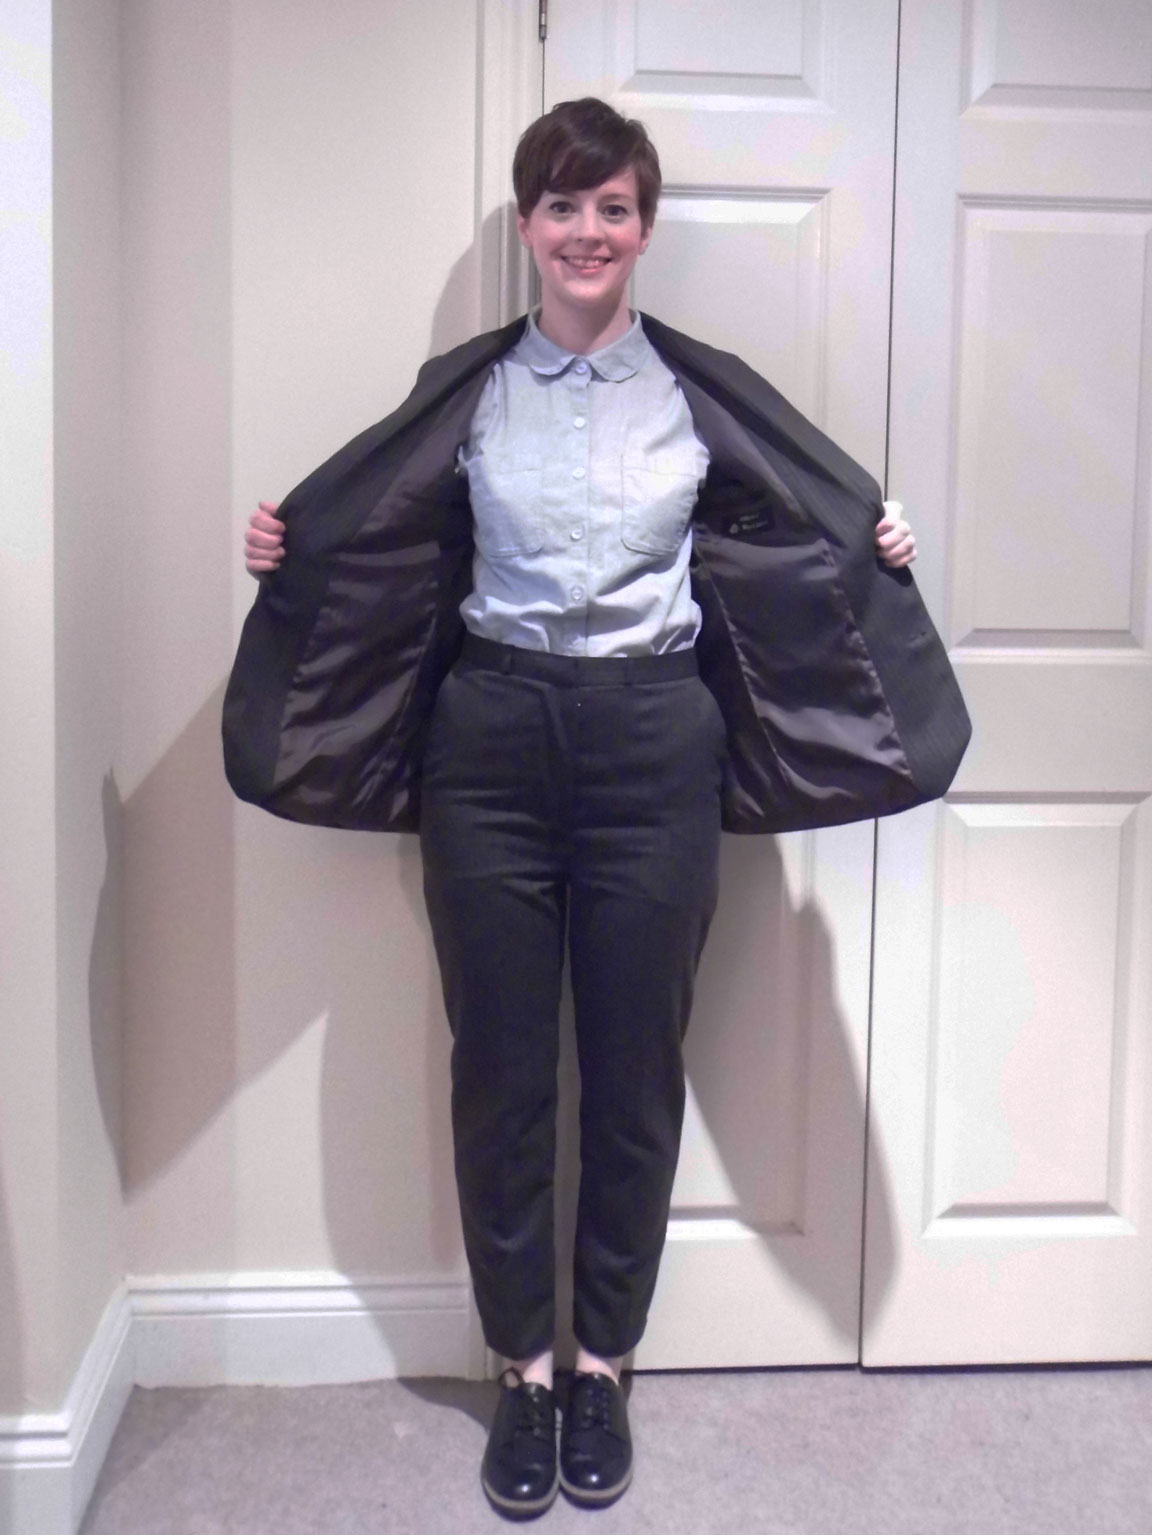
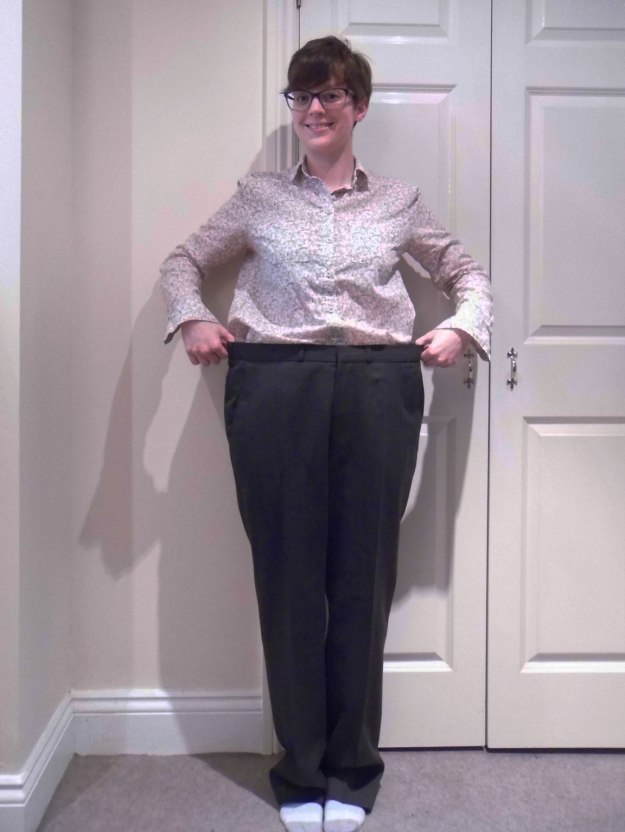
My Dad wasn’t a huge man, so I was a little shocked by just how big the suit was on me – though I am small I suppose.


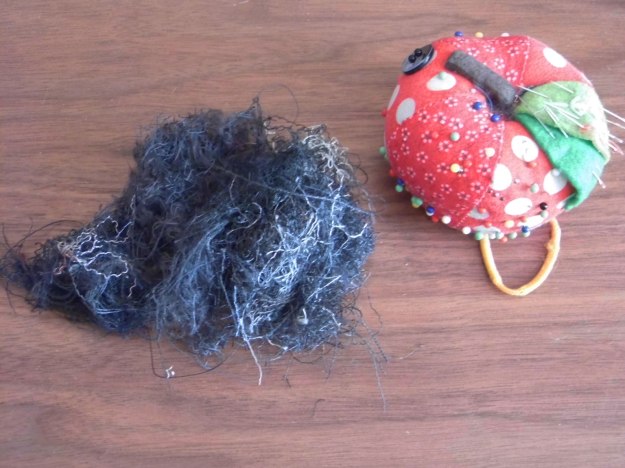
The first thing I did was to unpick the vast majority of the seams – and man did it take a long time! It was my occupation while watching TV in the evenings for about 2 weeks. I even took a picture of all the thread I removed (with pin cushion for scale)!

And this is the pile of pieces.

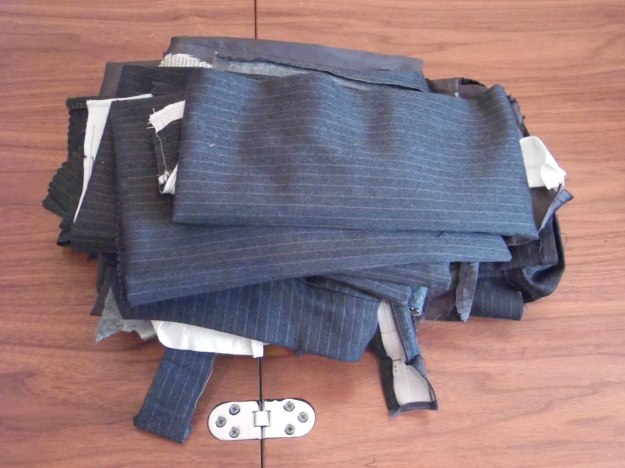
I unpicked everything from the trousers – side seams, inner leg seams, the fly, the zip and the waist band. I even managed to pry off the metal hook above the zip to use again later. The only things I left were the pockets and I wanted to use them in the new trousers. With the jacket I similarly unpicked everything – I removed the lining, the took the sleeves off both lining and shell, unpicking the underarm seam; I unpicked the side seams of both lining and shell; the shoulder seams; and I unpicked all parts of the collar. I also removed the shoulder pads and removable canvas around the shoulders – most of the interfacing and the like I left as I was remaking a jacket, so it saved me a job!

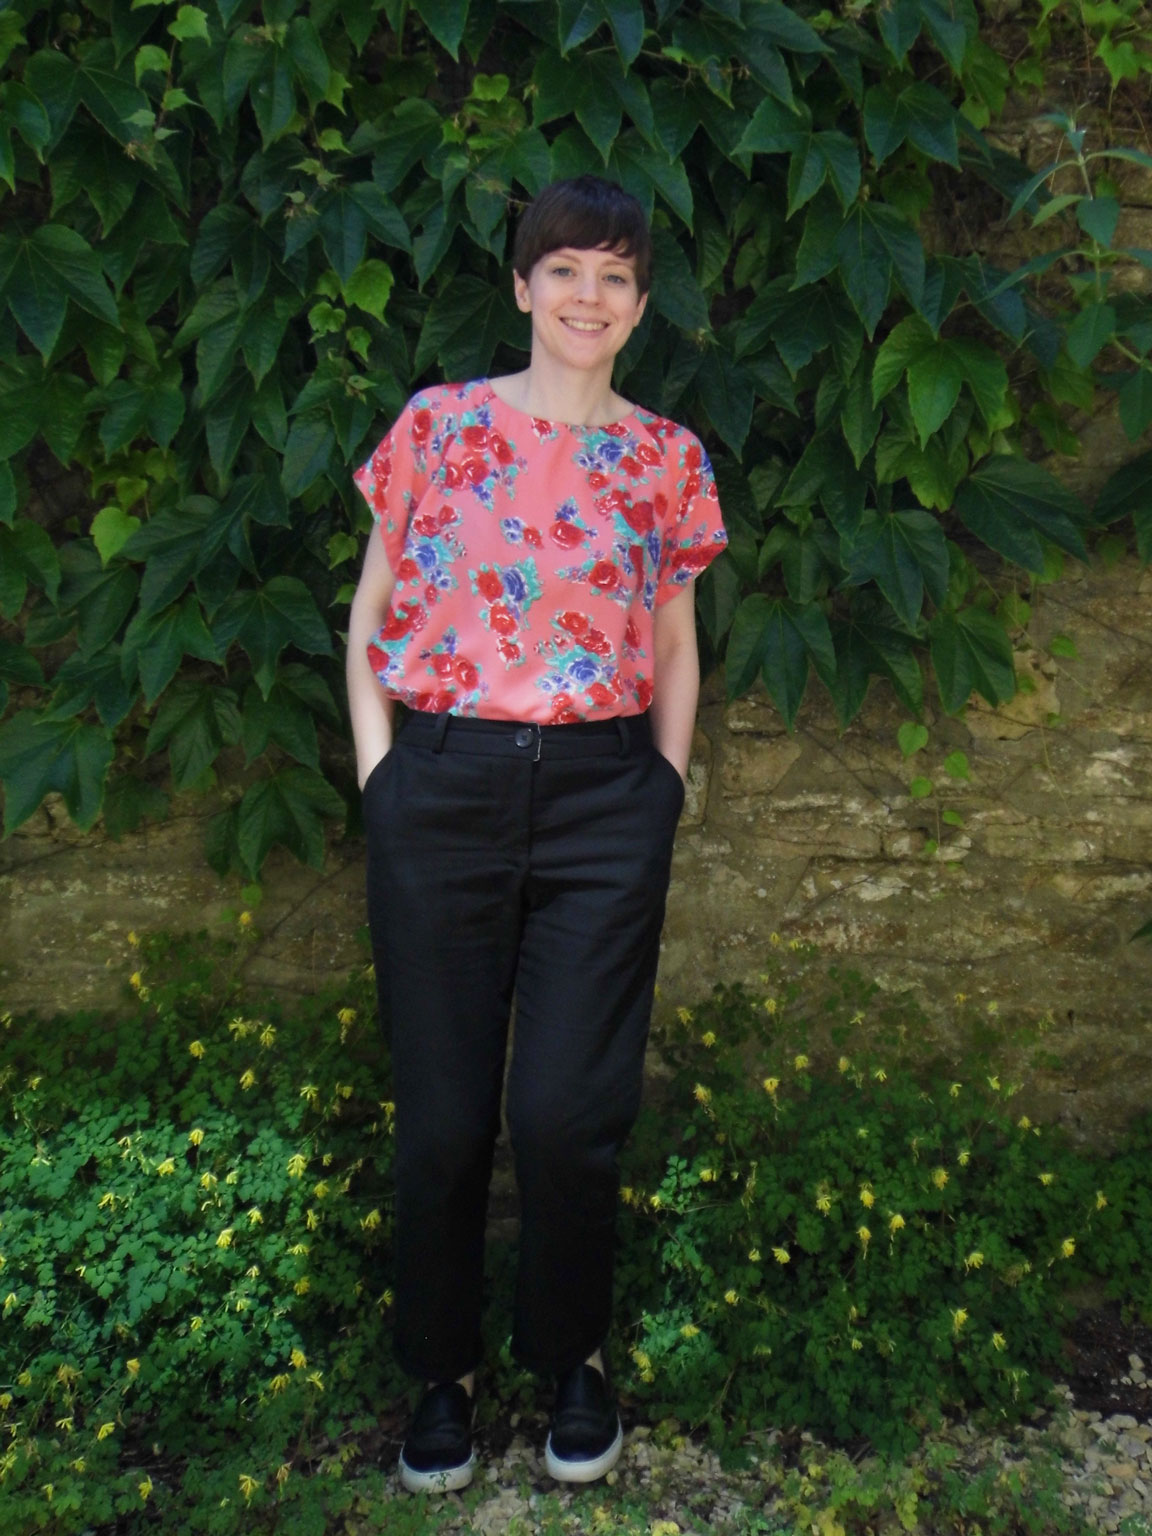
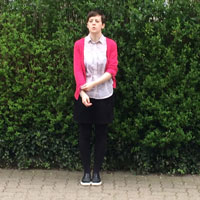
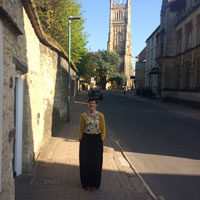
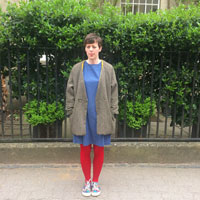
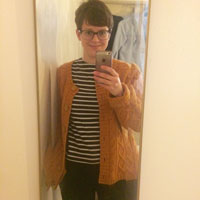
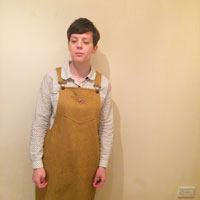
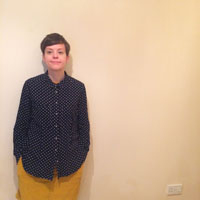
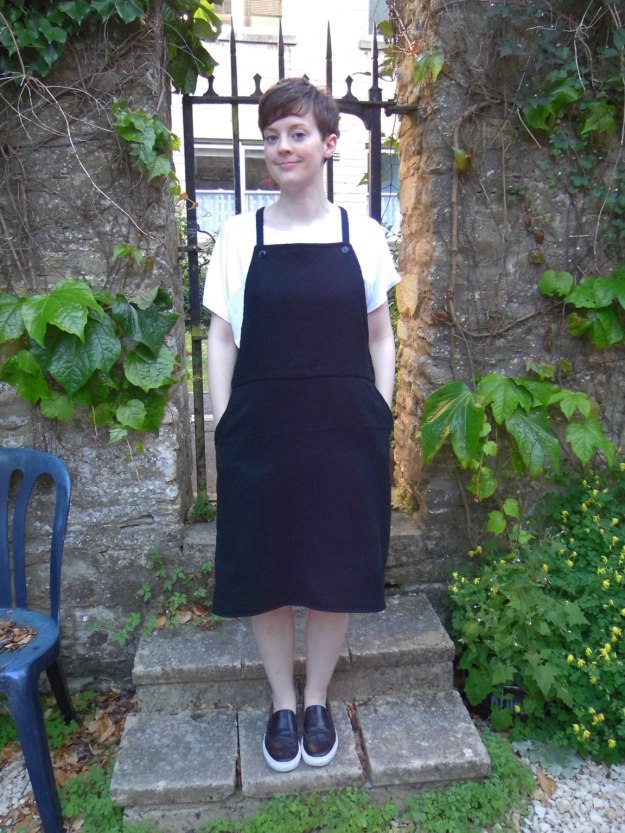
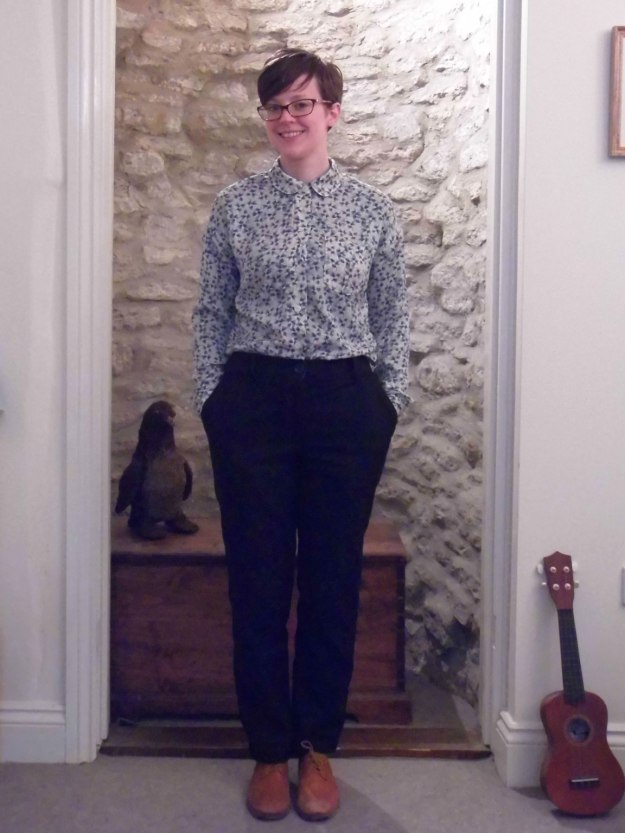
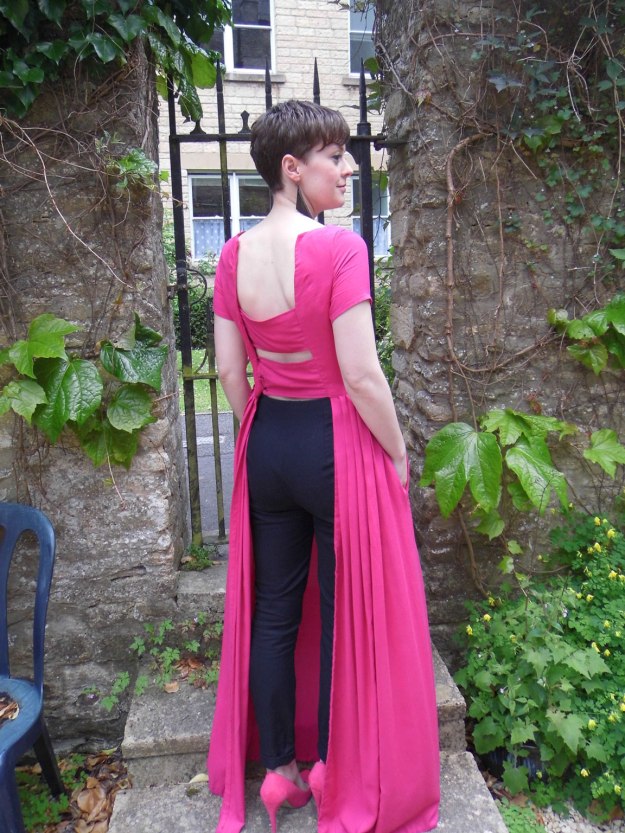
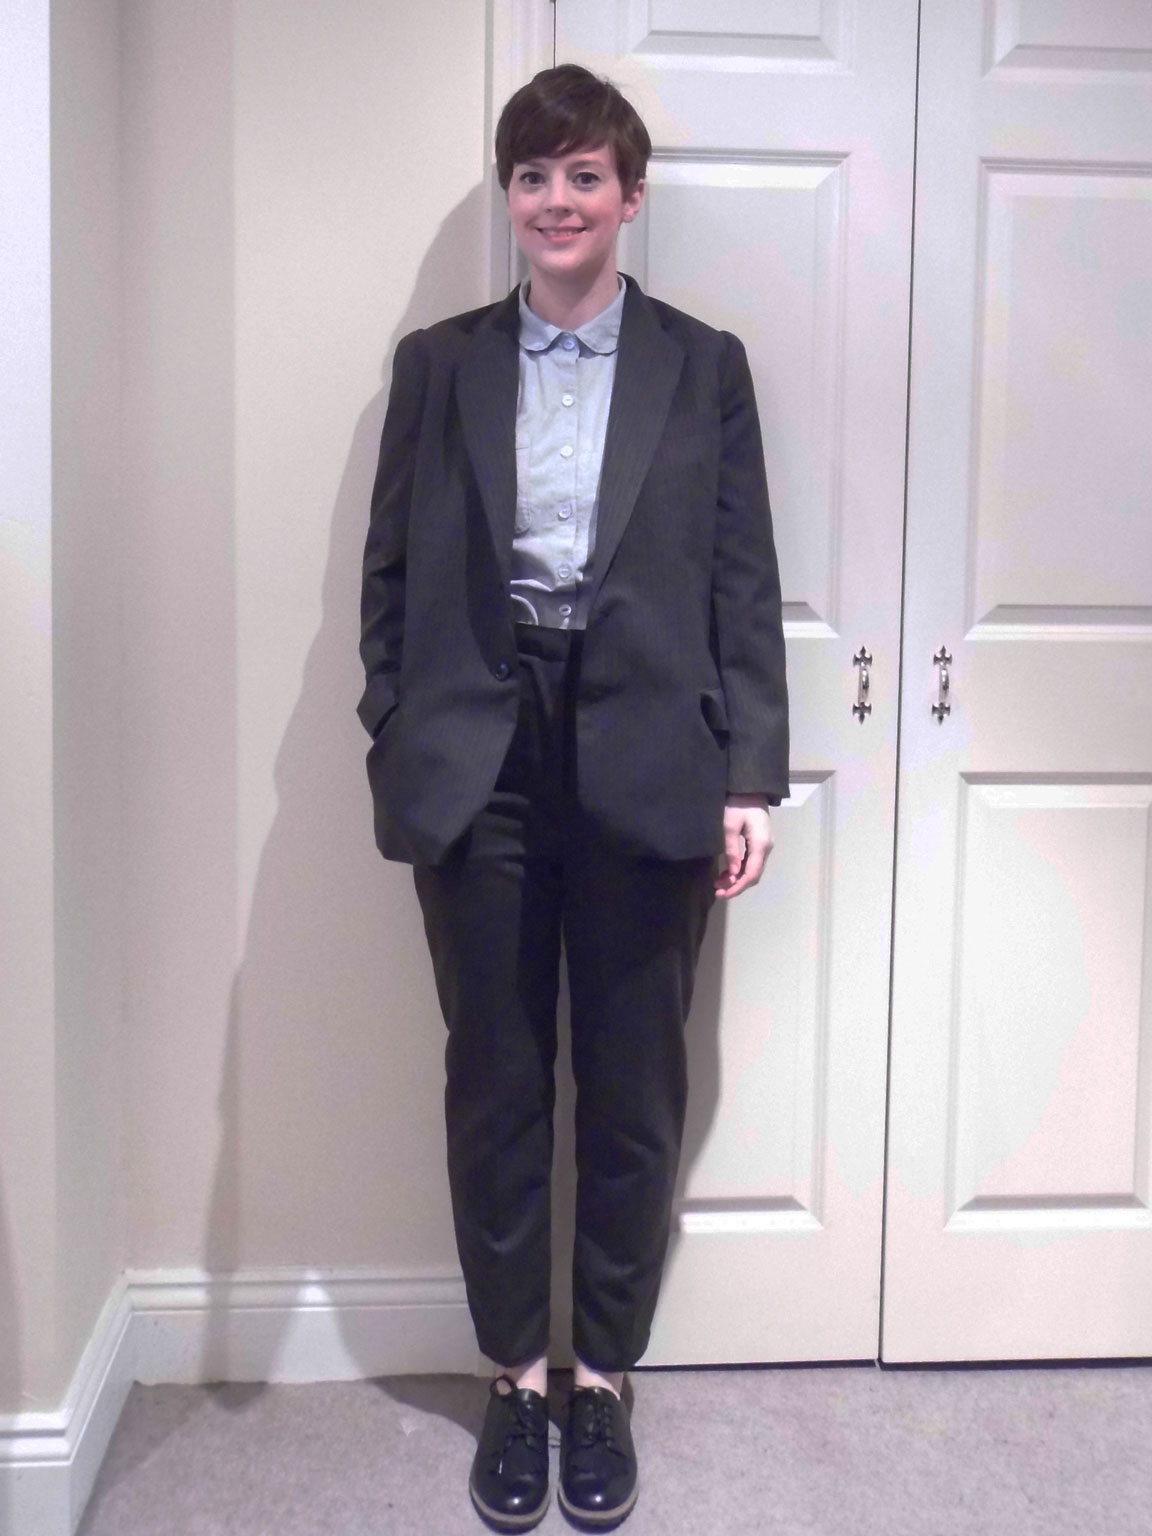
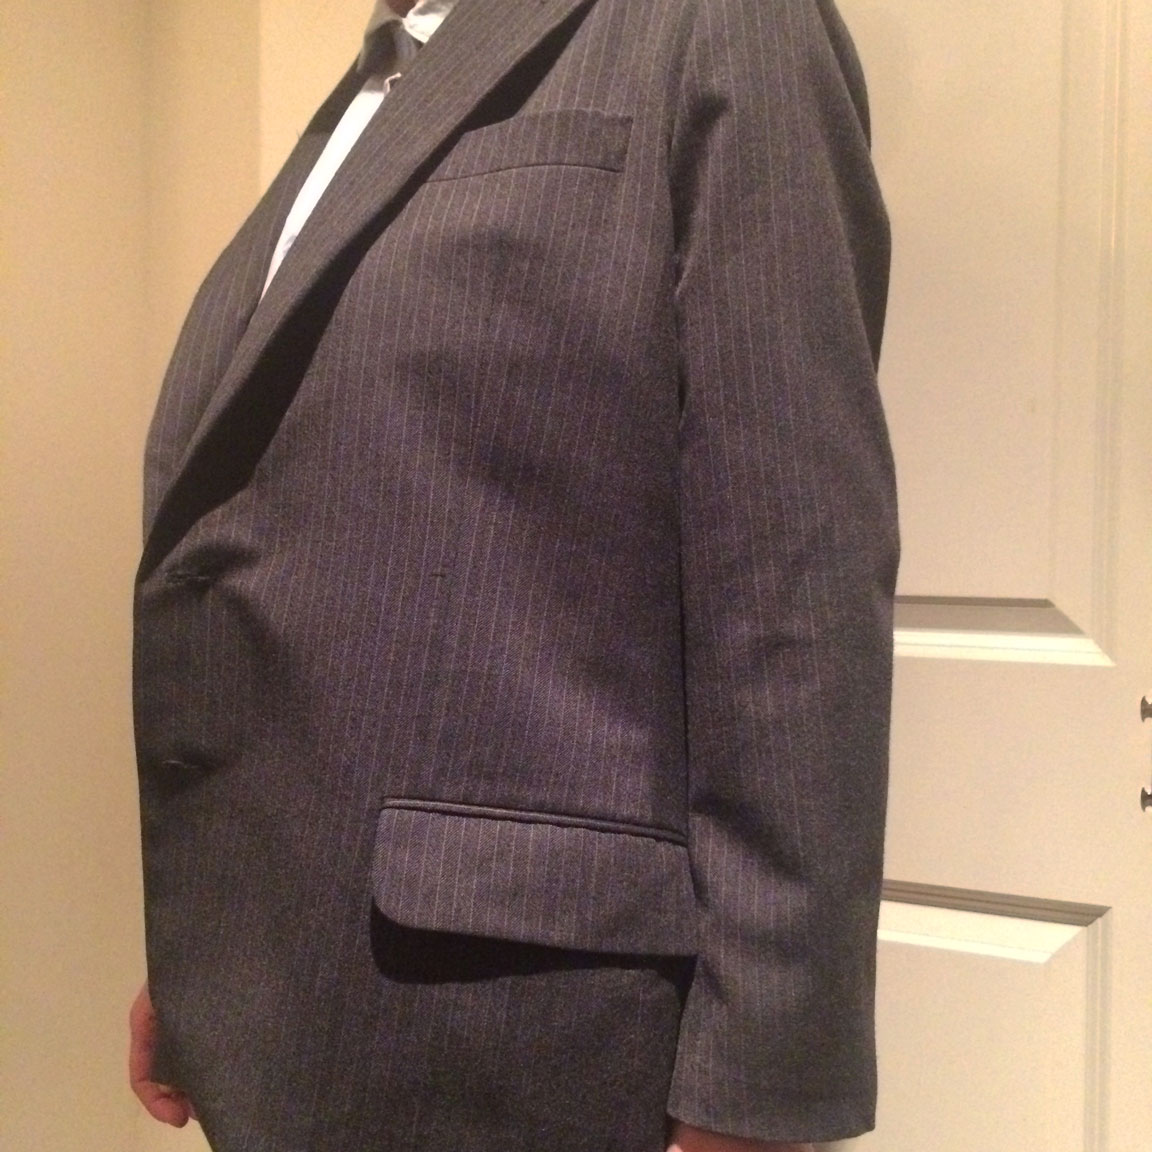
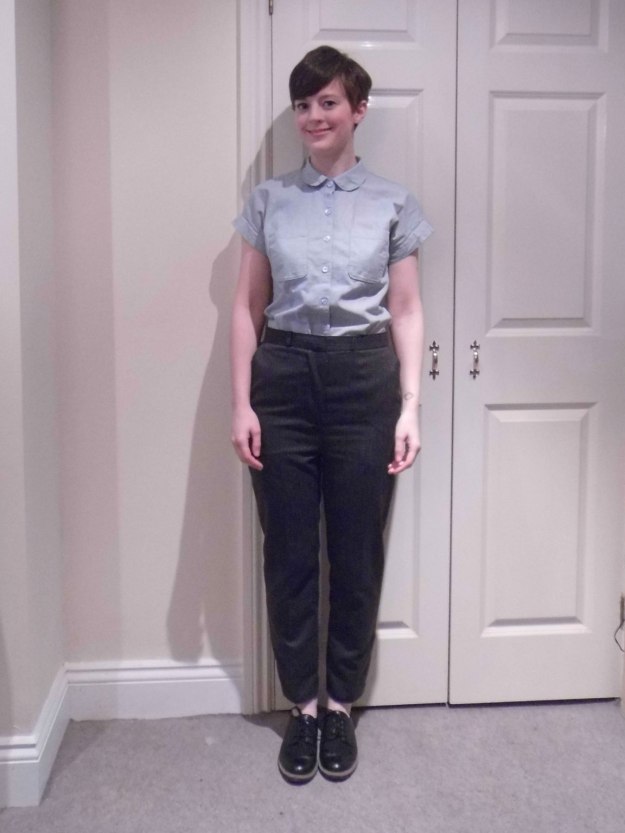
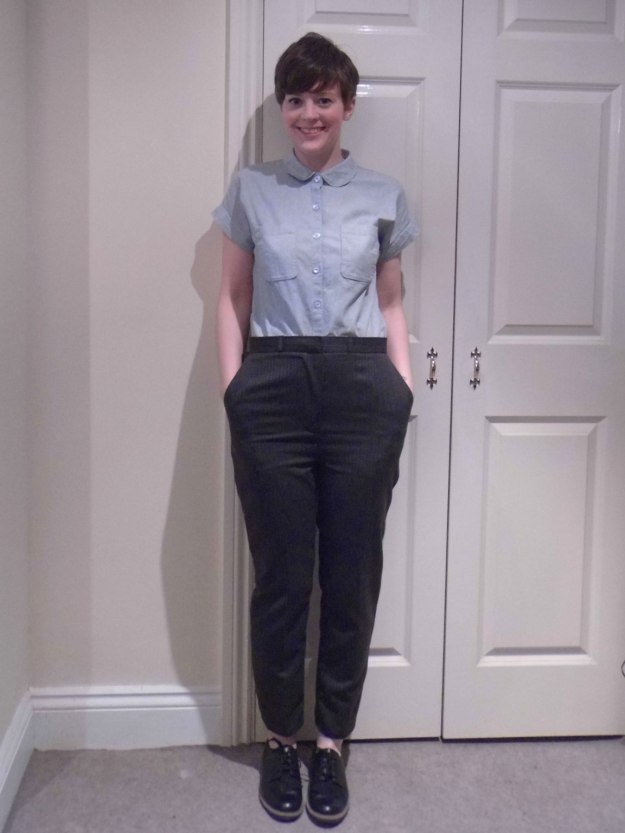
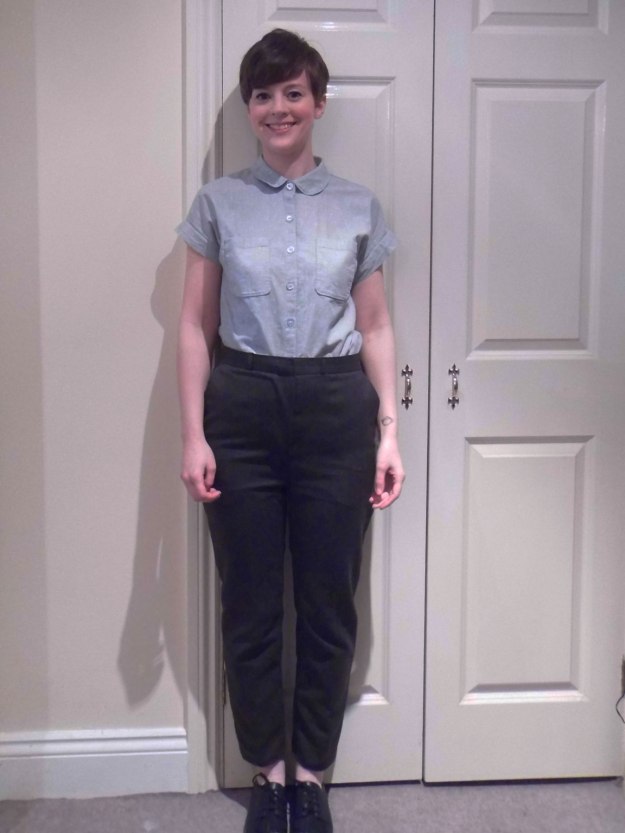
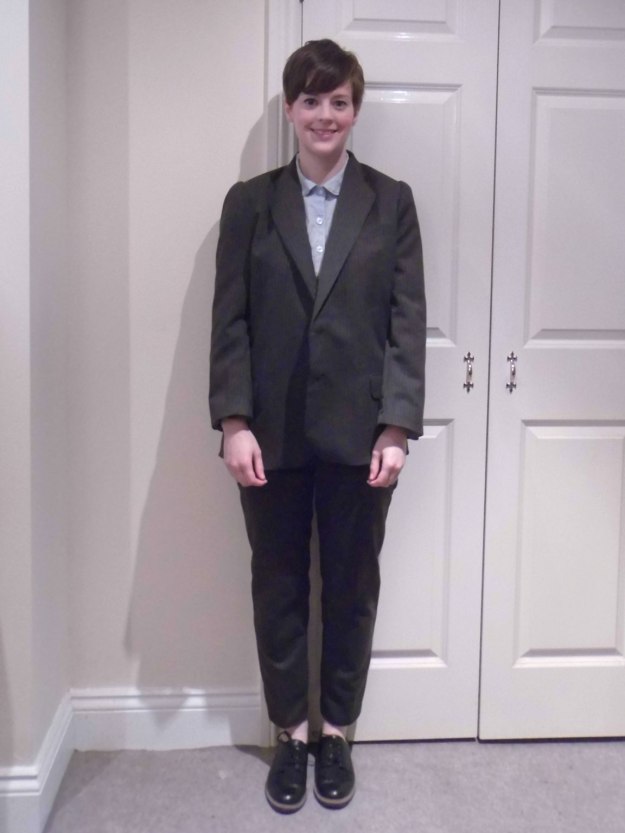
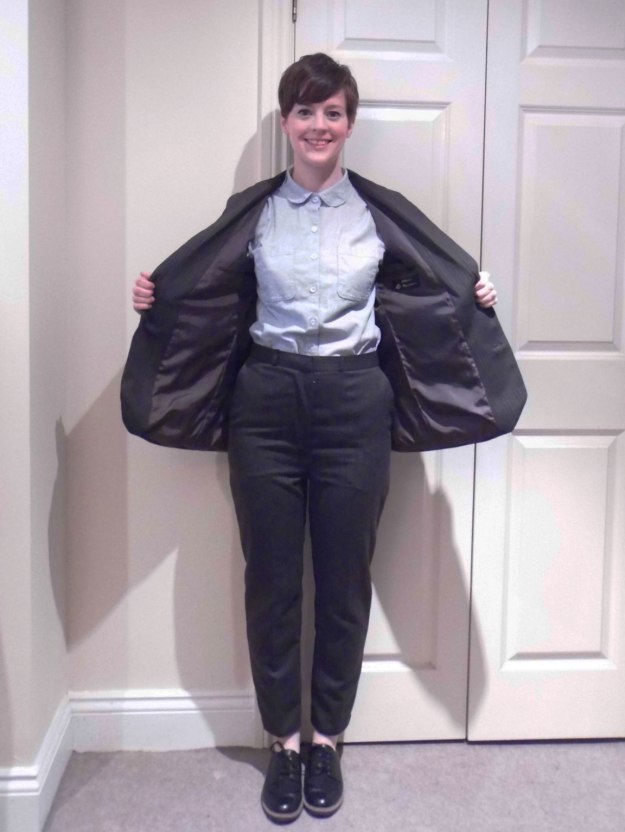
And this is the finished suit! I’m pretty pleased if I’m being totally honest. And I think I’ve been bitten a bit by a tailoring bug and would like to make a proper jacket from scratch to see all the processes I was able to skip by virtue of them already being done.

I thought I would go into detail about the trousers first, then the jacket, as that’s the order I re-made the suit in.

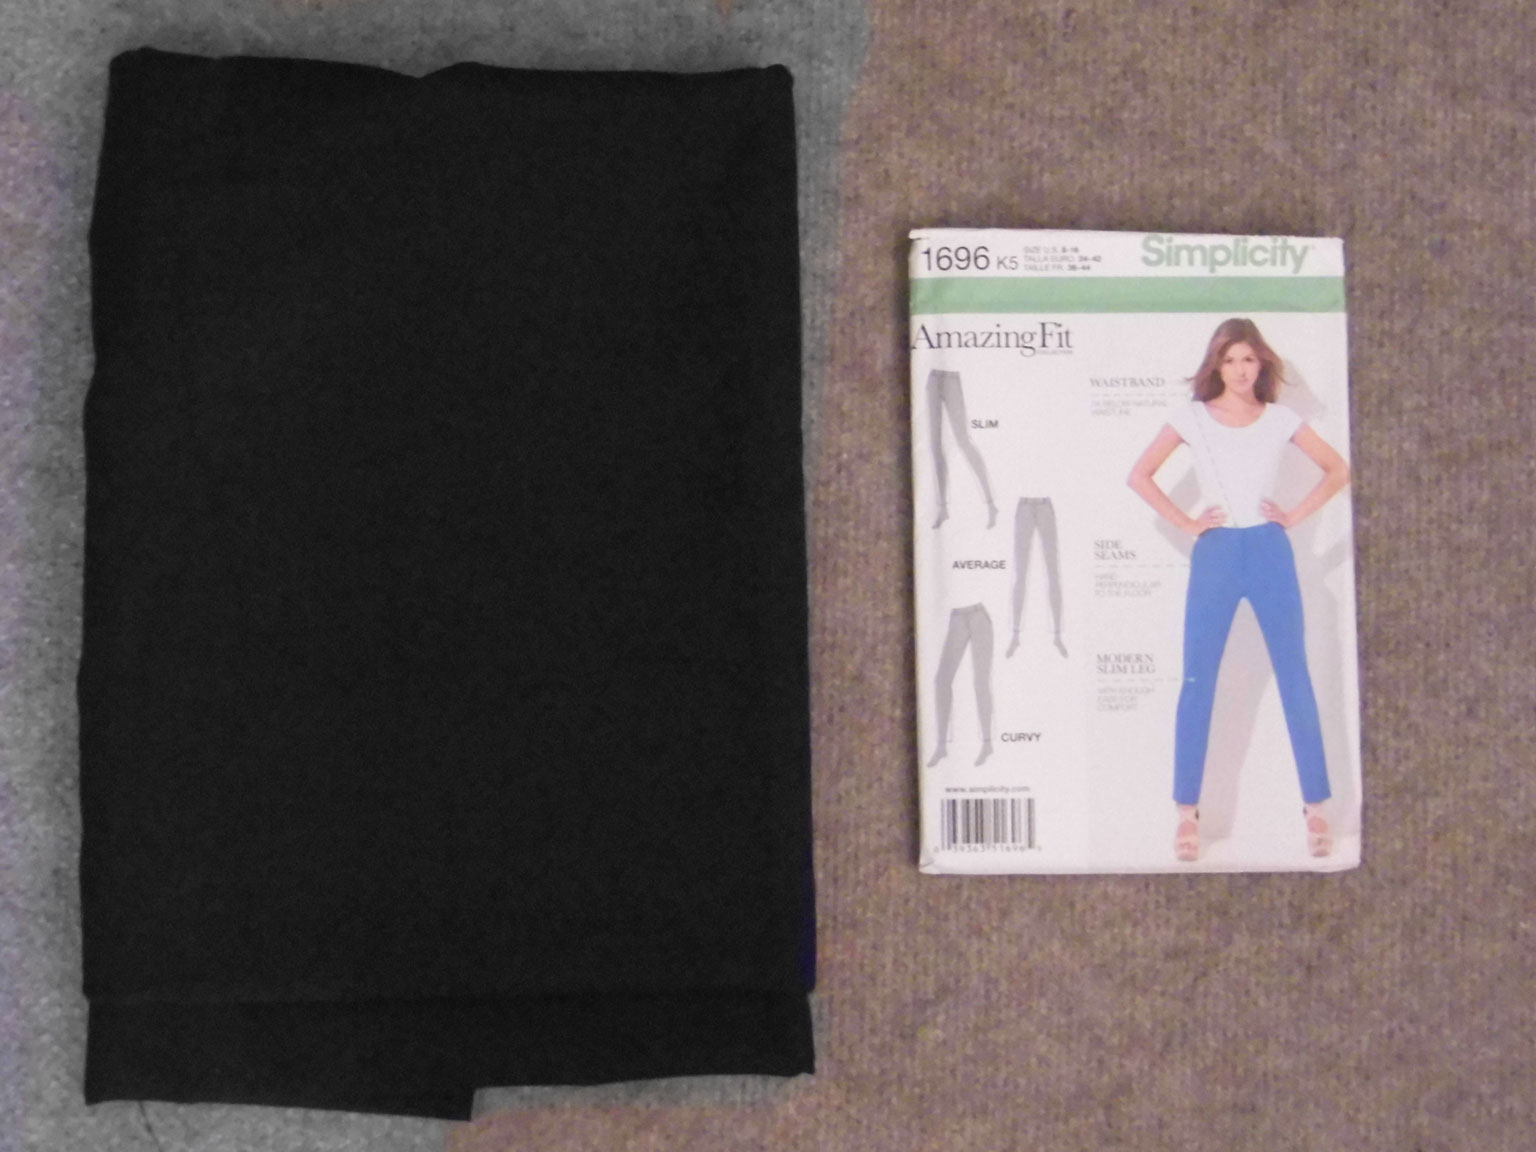
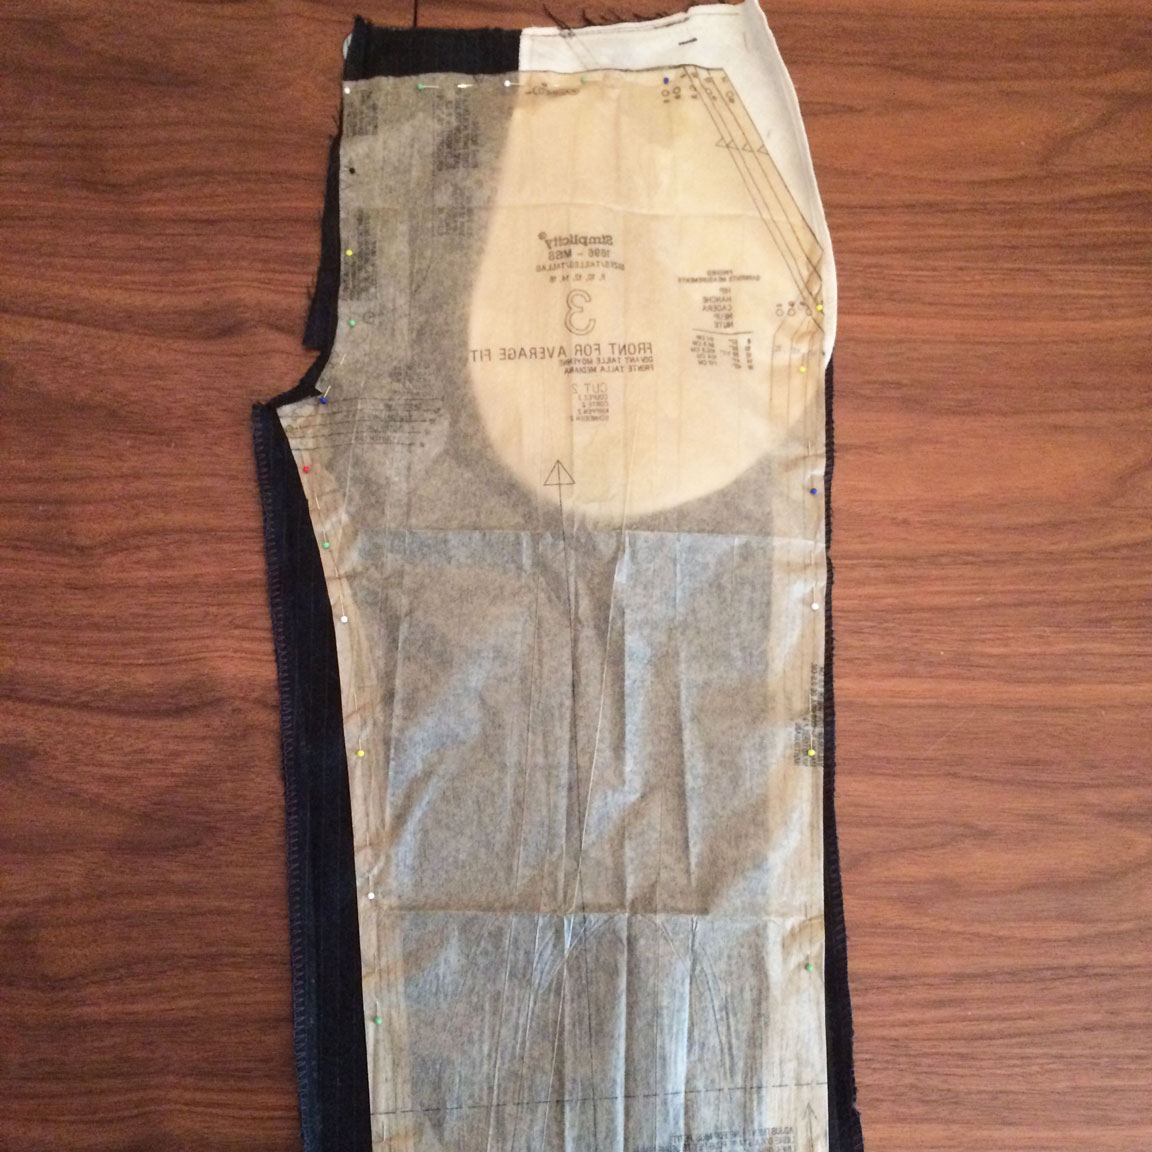
I used the Simplicity 1696 pattern as I knew I would be able to just about get them to fit me as I have made the pattern once before. As you can see below, I did extend them a little higher in the waist as I wanted to keep the full pockets, and although the trousers were quite big on me, I couldn’t bring the pattern piece to the top of the original trousers as the crotch curve wouldn’t have fit. After taking so much off the legs of the pattern the last time, I decided to narrow the legs at the pattern stage – though I ended up taking them in too much, so I had to reduce the seam allowance to 0.5cm to make them not skin tight!

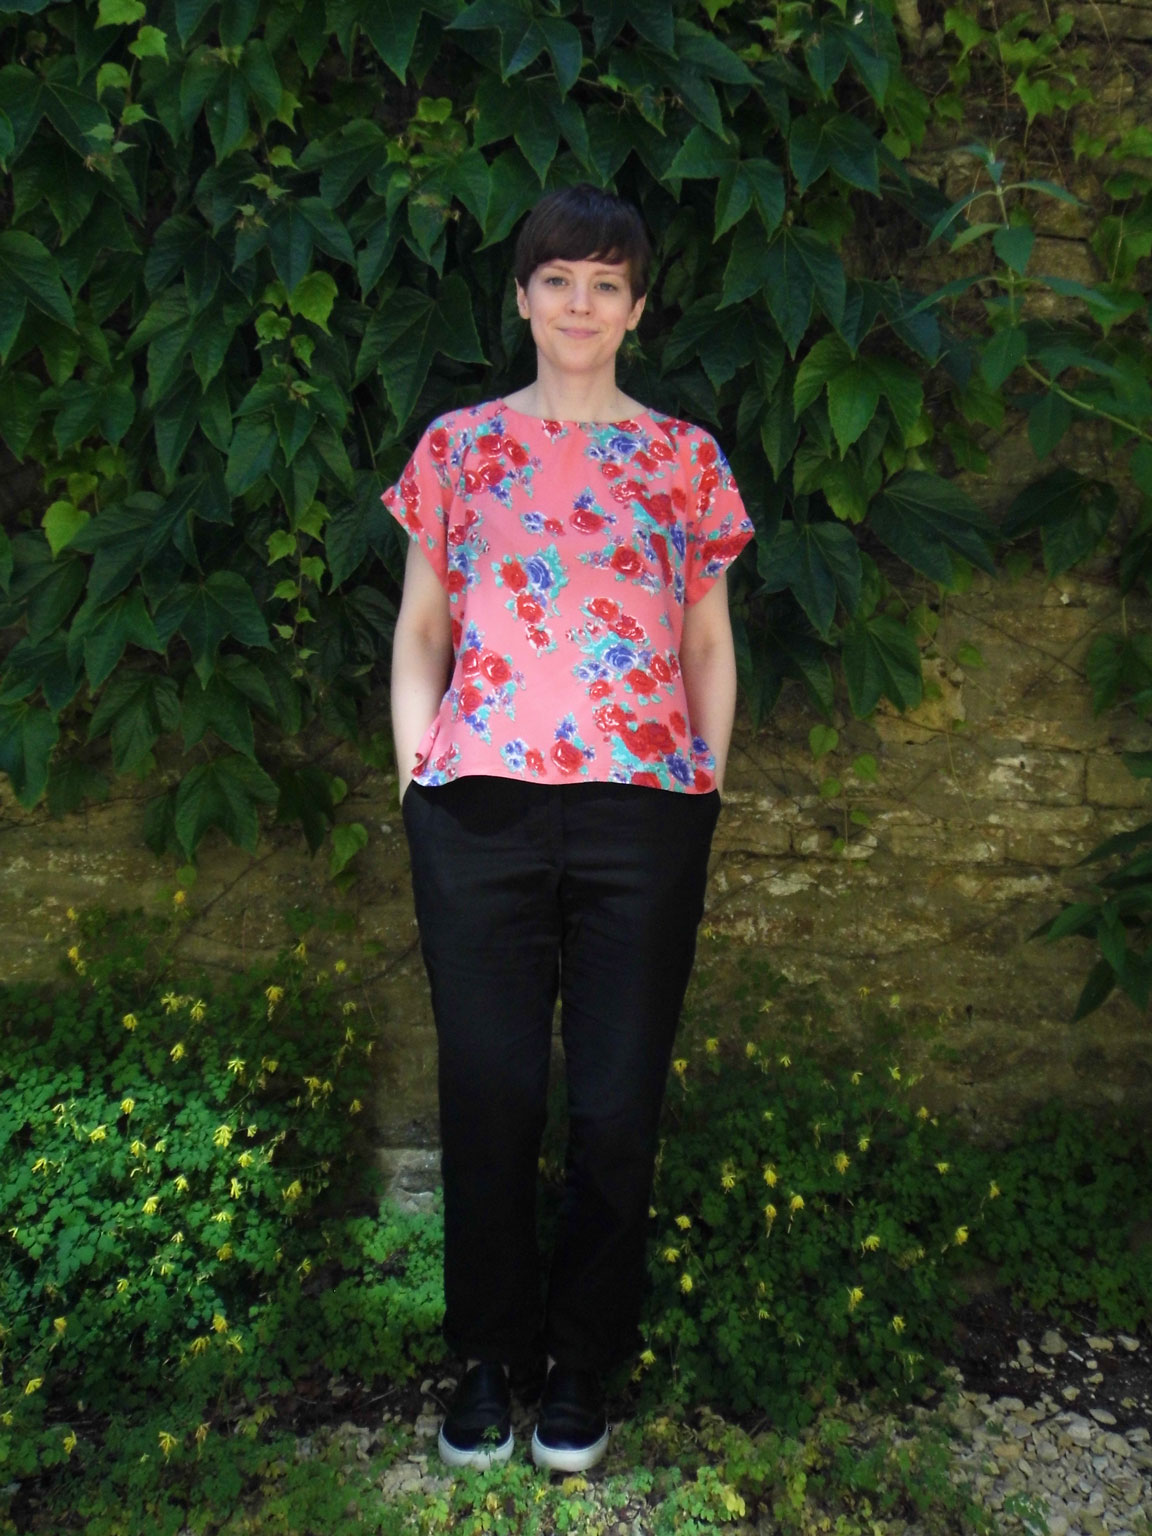
I made the size 14 as before, and did quite a bit of fiddling with the crotch curve. I took 4cm in total off the back seam, including the waistband (which is the original waistband of the trousers, and the original waistband facing) and had to take 2cm off both crotch curves (front and back) – I think that’s what they’re called? I kept basting the seams, then trying them on, then unpicking them, then repeating the whole process until I thought it was good enough. They’re not perfect, but I didn’t want to over-fit them and make them uncomfortable to sit down in, which is always a worry!

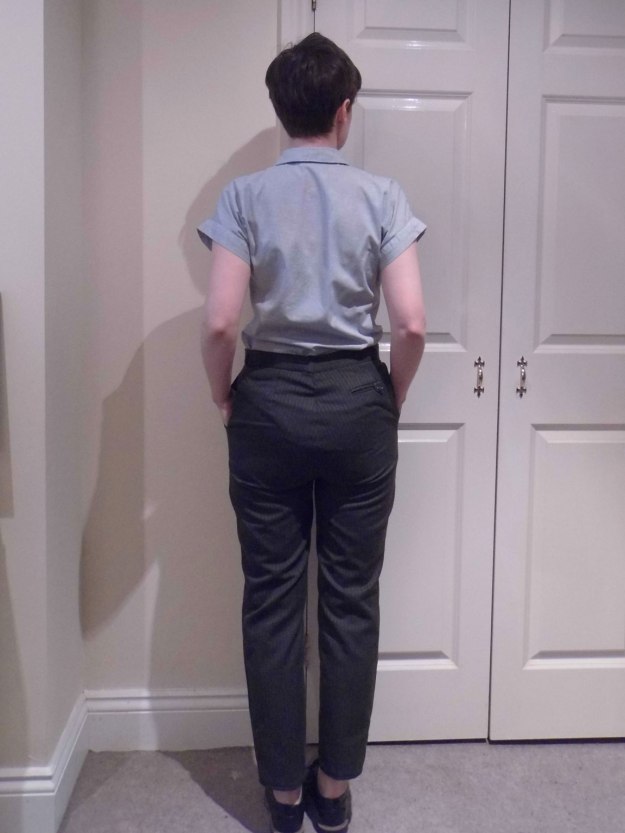
Men’s pockets are soooo huge! I’ve got other ready to wear things (and probably things I’ve sewn) with teeny tiny pockets – pockets too small to fit an iPhone. But I can get half my arms in these pockets! I’m very glad I kept them. Also it’s so quick to sew a pair of trousers when the pockets are already done!

I did do a totally new fly, though I used the original zip. I had to slightly fudge the fly piece and the fly shield as because I had made them more high-waisted than in the orignal pattern, the pieces weren’t tall enough to reach the waist band. The original fly and fly shield were much thinner than the ones for this pattern, so I used the pieces I had cut off the bottoms of the trouser legs to make new pieces. It pretty much worked, and you can’t see any of the McGyvering on the outside.

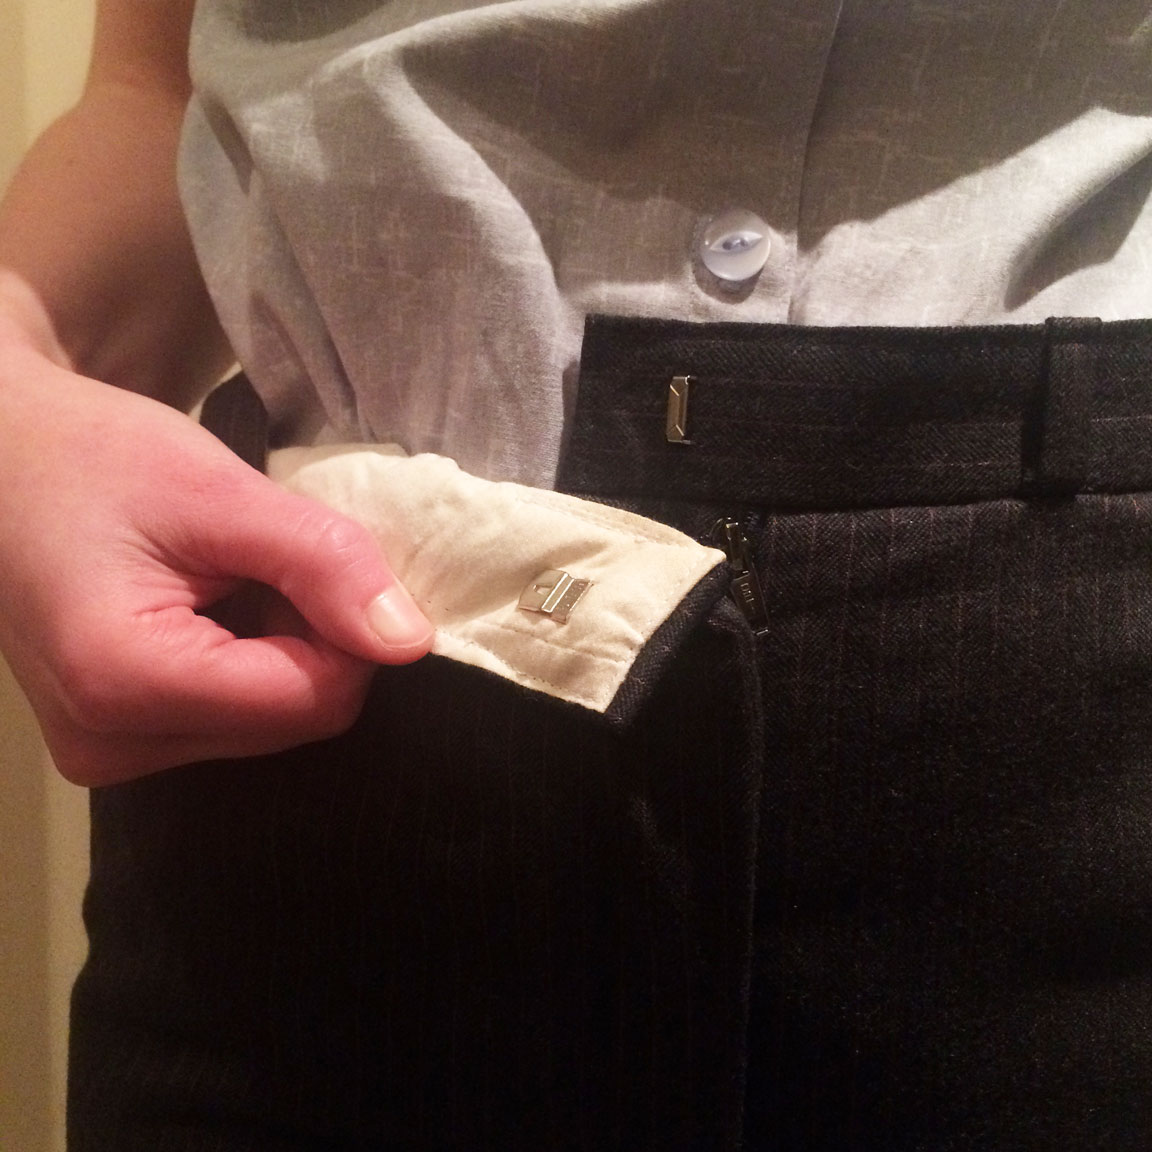
One of the things I’m proudest of is managing to keep this metal clasp – I bent the prongs that went through the waistband facing to get it off, then poked it through once Id finished the trousers, when I knew it would be in the right place. The hook part of the clasp stayed where it was from the original waistband – I just made sure I used that end in the right place and trimmed the excess off the other side (and from the back seam too) so I could keep the metal thingy.

The original waistband facing (and the pocket bags) are made from this weird cream fabric, as shown above. The facing must be interfaced as it’s quite thick (unless they’re 2 different cream fabrics). Anyone know why it would be so contrast-y? Also there was a gusset from the same fabric in the seat of the trousers, but I did not put that back in as it looked a little worse for wear (gross!).

I also managed to keep the one back pocket, though I definitely think it could have been placed better! I cut out the 2 back pieces at the same time, for speed, but didn’t really take into consideration where this pocket was and made it so I was worried it was going to disappear into the side seam. Luckily there’s only one, so it’s not like one is perfect and the other one is around the side, so hopefully it isn’t as noticeable as I think it is!

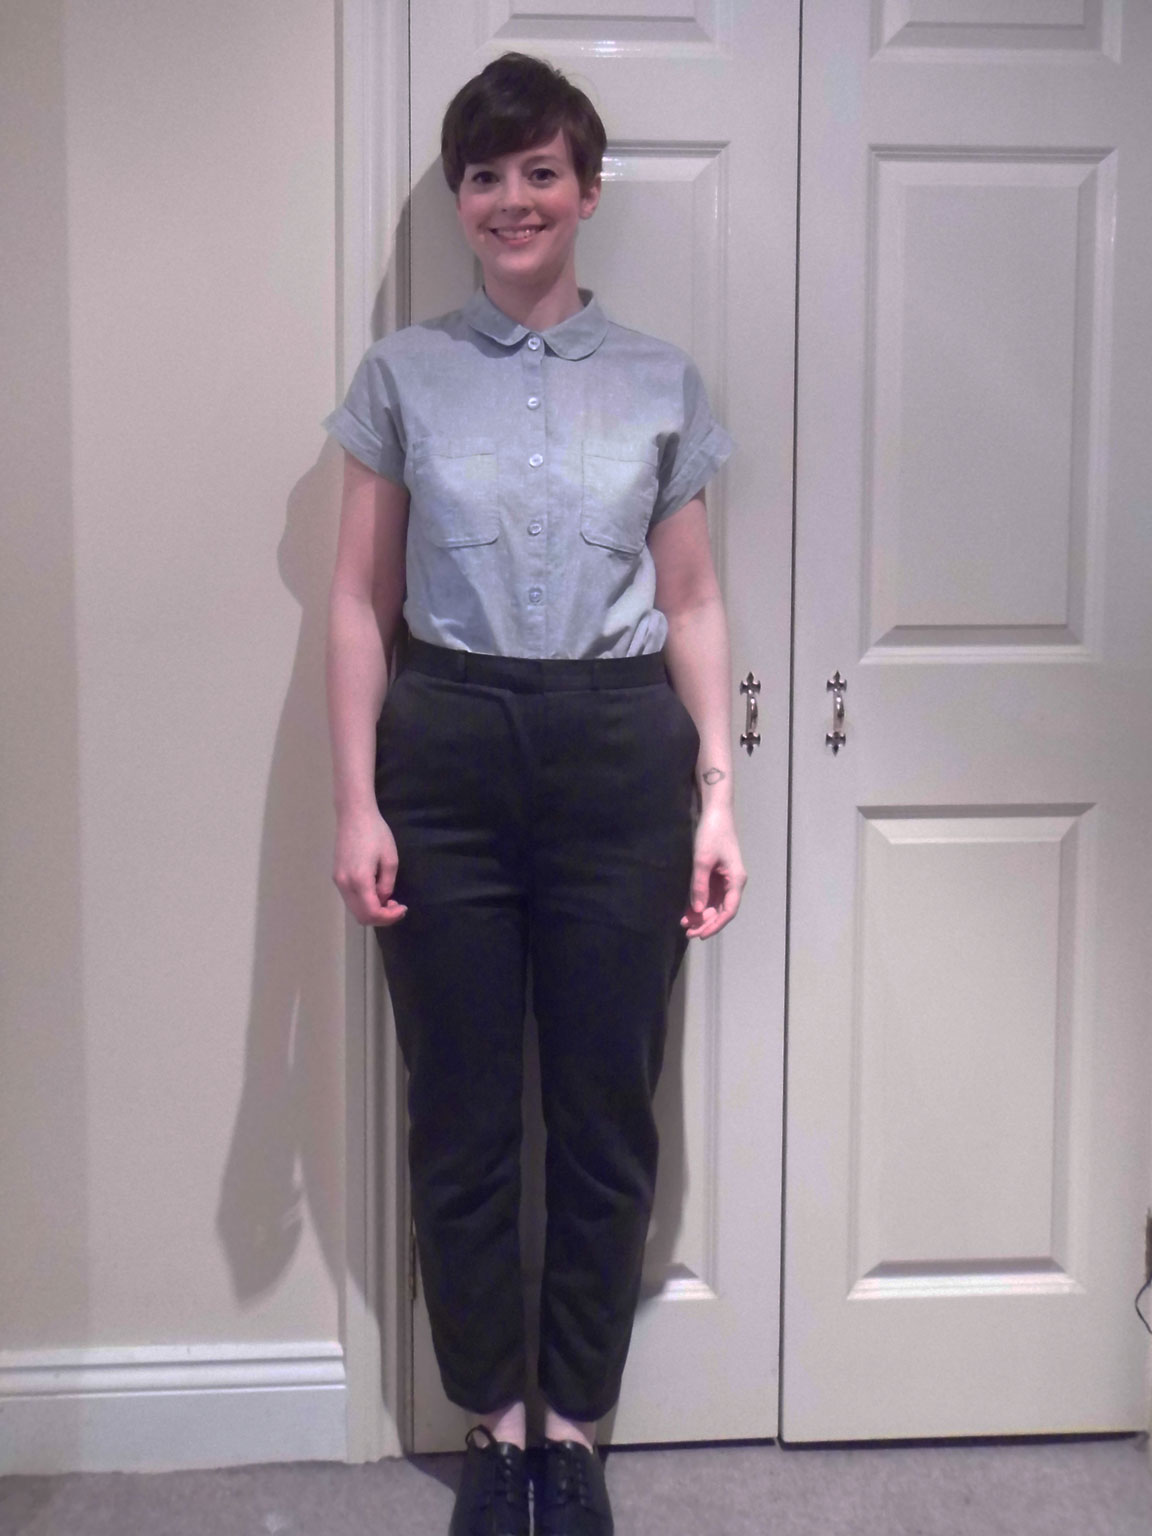
Even after cutting off a chunk of the length of the trousers when I trimmed the legs to match the Simplicity pattern, I still had to shorten them by 8cm to get the ankle length hem I was after. I cut off 6cm and left myself 2cm for a double folded hem. I hemmed them on the machine, but I’m temped to unpick it and sew it invisibly by hand as a machine hem doesn’t fit with the style of the trousers. But they’re wearable for now.

And now onto the jacket.

I was going to use the Great British Sewing Bee Hacking Jacket as a pattern to base the jacket on, but I could not get the pattern pieces to fit. Boo. I do want to make it one day as I like the style of it, but for this jacket I decided to slightly wing it and take it in on all the seams where I had unpicked – I maybe shouldn’t have been so hasty to unpick so much!

I think it might be easier to just list all the places I took it in and by how much (in case you’re interested):

5cm off the shoulders
3cm off the side seams (initially I took off 5cm but the pockets were too much to the side so I changed it)
3cm off the back seam (in 2 chunks as I kept tweaking the adjustments)
3cm off the shoulders of the jacket (to bring the shoulder seams up from part way down my arm)
3cm off width of the sleeves
8cm off the top of the sleeves (I traced the shape of the sleeve head and moved it down the sleeve by 8cm to try to keep the button detail on the cuffs of the sleeves, but this didn’t end up working
6cm off the back of the collar

Phew! As you can imagine, this took a loooot of time and a lot of trial and error. The only new things I put in were new shoulder pads, made from wadding. The ones that I took out of the jacket were really past their best and starting to disintegrate. Also they were much too big for my re-sized suit, so it seemed easier to start again.

I made all the same adjustments, above, to the lining. I thought about fiddling with the lining first, so I only had to sew the shell once, once I knew what adjustments to make, but I figured the wool could withstand more unpicking than the lining, which isn’t the most expensive lining in the world.

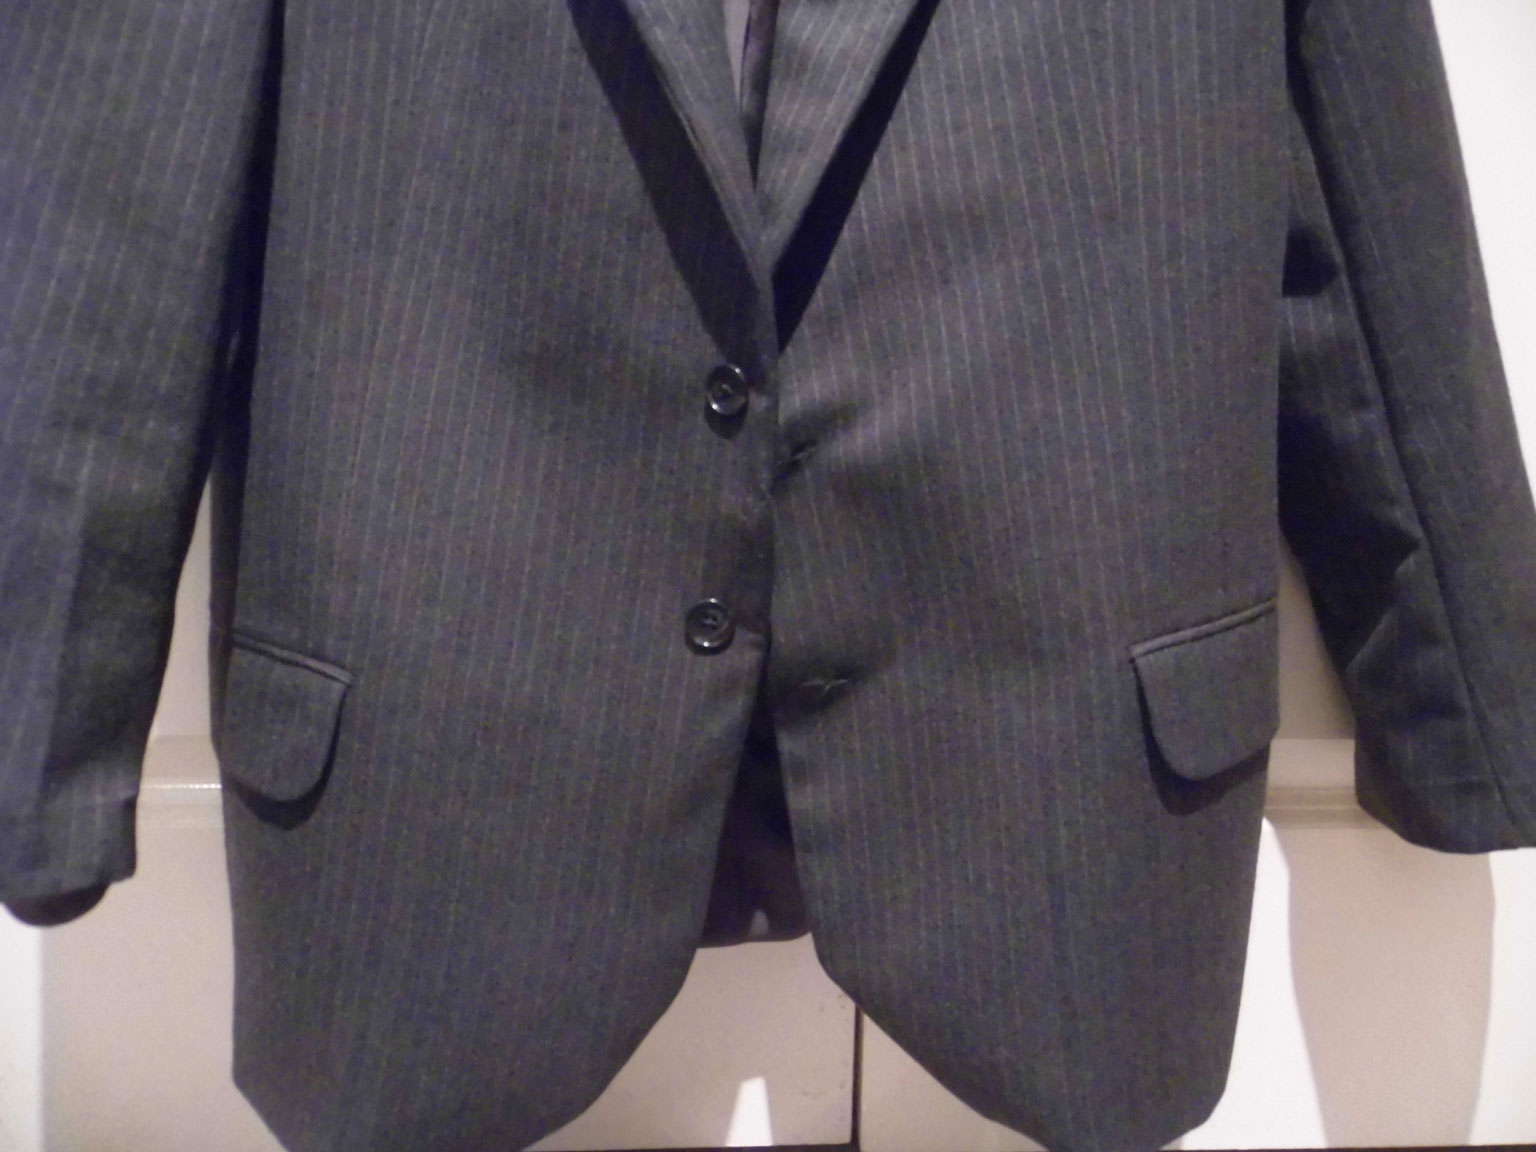
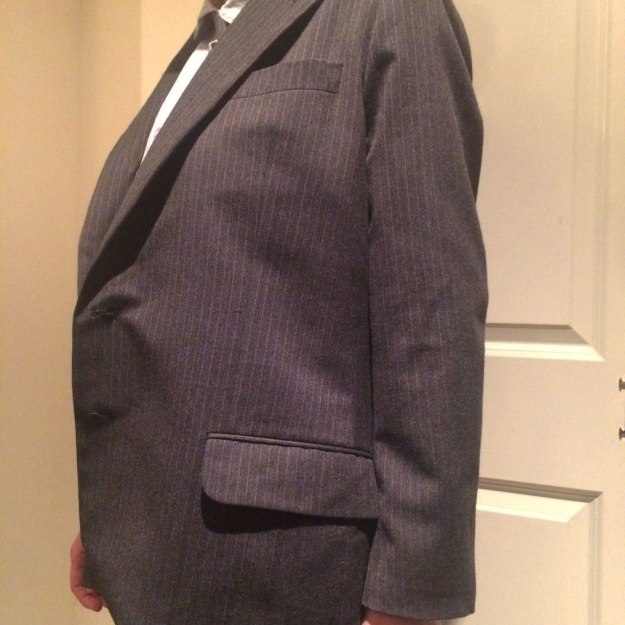
I made sure to keep the front of the jacket as untouched as possible so I would be able to put the lapels and collar back, without having to know how they work! I sewed a new seam in the back of the collar piece to narrow it so it fitted between the 2 lapels. It was also an advantage to have kept the lapels as they are still pretty well presses, so they don’t want to flap so they’re flat. The notch of the collar/lapel is maybe a little high, but there wasn’t much I could do about it to be honest!

It took a lot of fiddling to get the sleeves right – that is definitely a tailoring skill that I don’t have. I kept the original sleeve head shape and size as I feared making it so small the jacket would have to shrink to fit it, and not the other way around. At one point one of the sleeves was pretty twisted, because there are 2 seams on the sleeve (only one of which I unpicked and took in) and I had lined up the wrong one with the seam on the jacket. It did not feel right! As I mentioned above, I was hoping to keep the button detail on the cuff, but I couldn’t figure out how to do it – and, to be honest, I was running out of time for the deadline! It would have taken a lot more brain than I had at the time to figure out how to re-attach the lining to the button thing, so I got rid of the whole thing and just did a normal hem/lining seam.

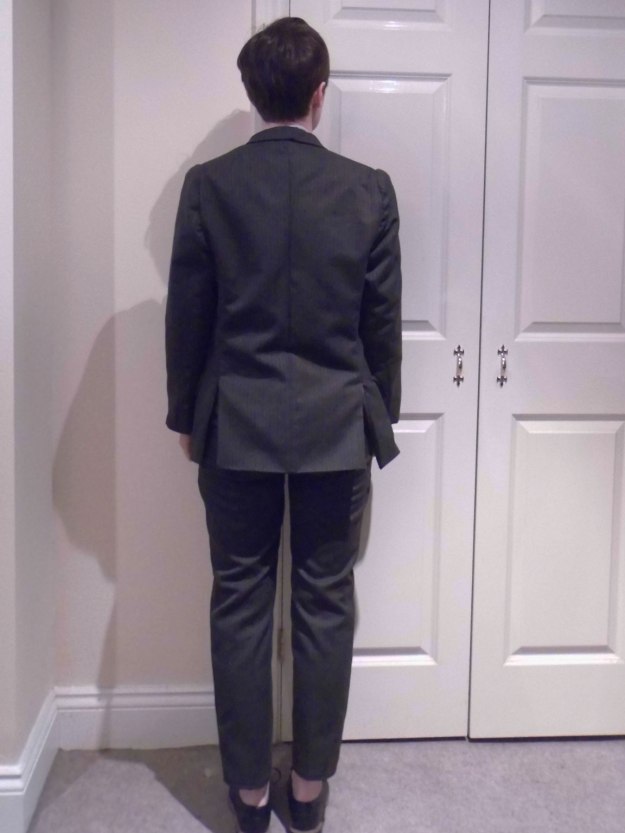
The back is maybe the least successful part – but maybe it just needs a good press? I tried to shape the back so it wasn’t quite so straight, but each time I basted it, it looked wrong, so I reverted to a straighter shape – and I’m glad I did as it’s more in keeping with the original style of the jacket. I also managed to keep the 2 vents at the back, which was, again, a headache to work out how to put the lining back in. I wish I had taken photos as I was unpicking as then I would have know how various bits looked before and would have had an idea of how to put it all back.

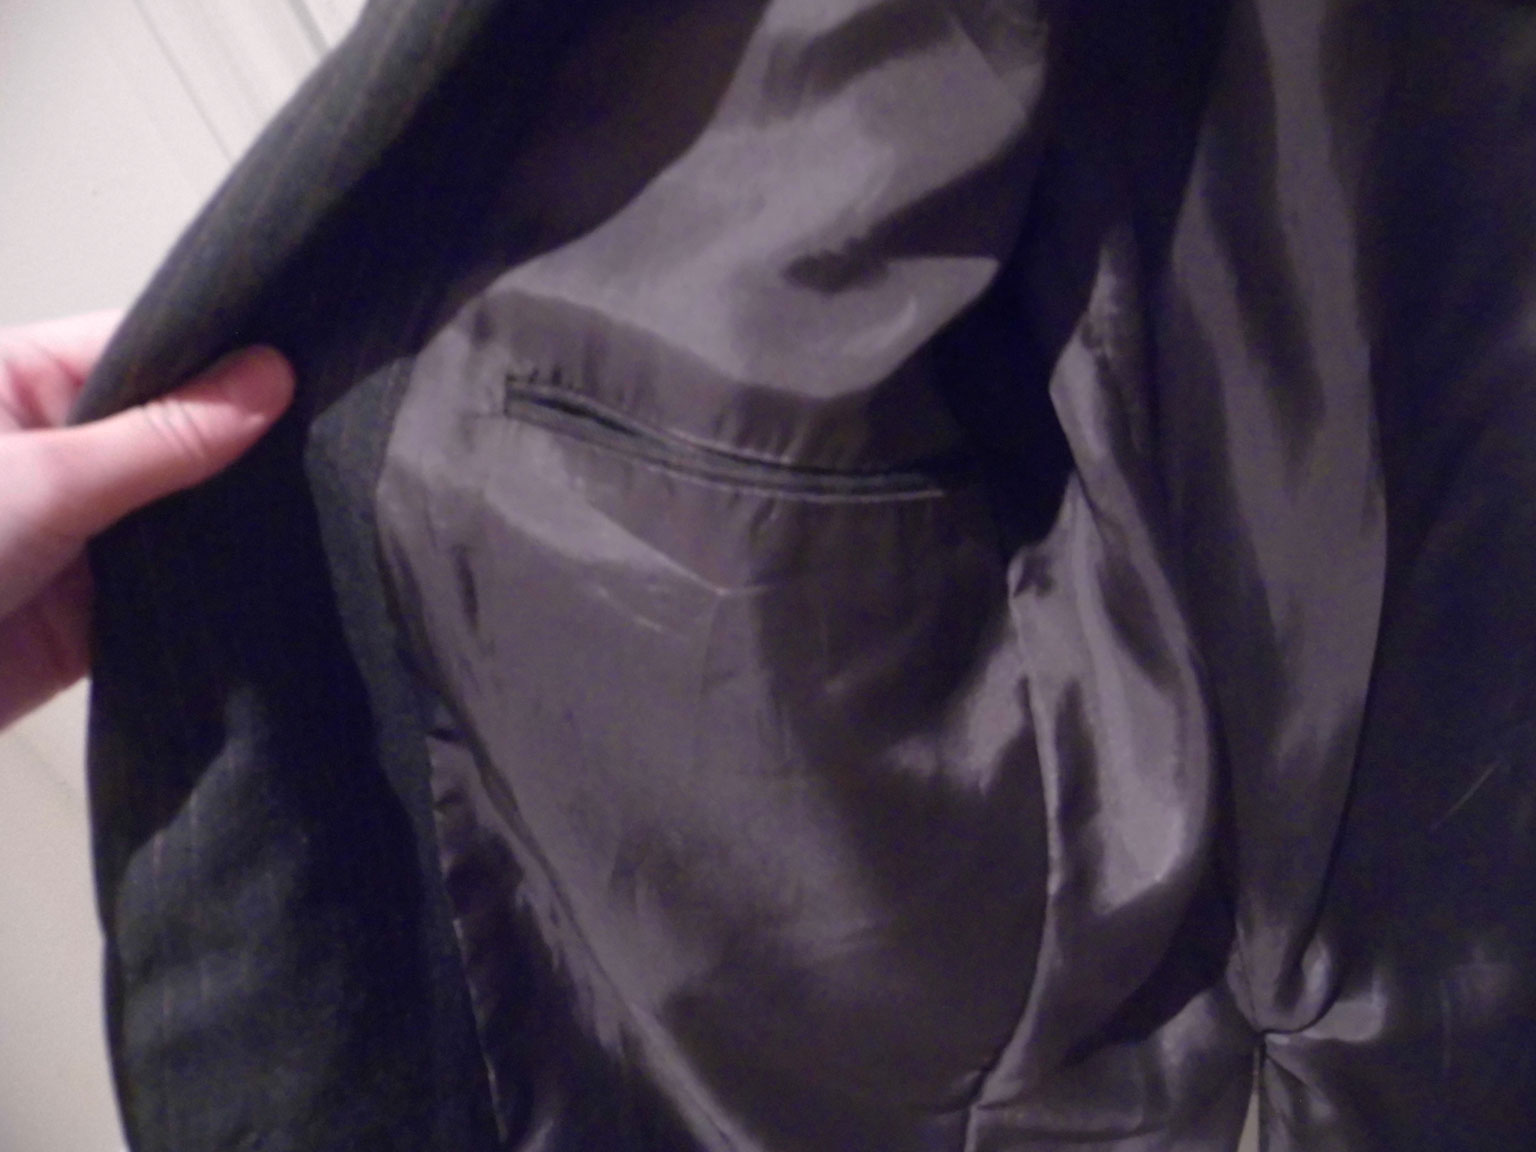
I’m glad I managed to keep all the pockets – on the outside and in the lining – as they keep the jacket looking quite like the original, and I didn’t have to sew any pockets! Hurray!

The final change I made was to shorten the jacket by 6cm, leaving a 3cm hem (which is how much hem was on the shell before), then the lining was shorter and neatened the whole thing. I was slightly shocked when the lining actually fit the shell, when I went to sew them together again. I bagged it out, unpicking a seam in the side of the lining, then stitching it back by hand once the jacket was turned around. I used this tutorial from Grainline for attaching the lining at the cuffs.

I have resewn the buttons since I took these photos, by the way – you can see below that they absolutely do not line up! It was very late and I was rushing to finish and take photos before the deadline of midnight on the 31st October!

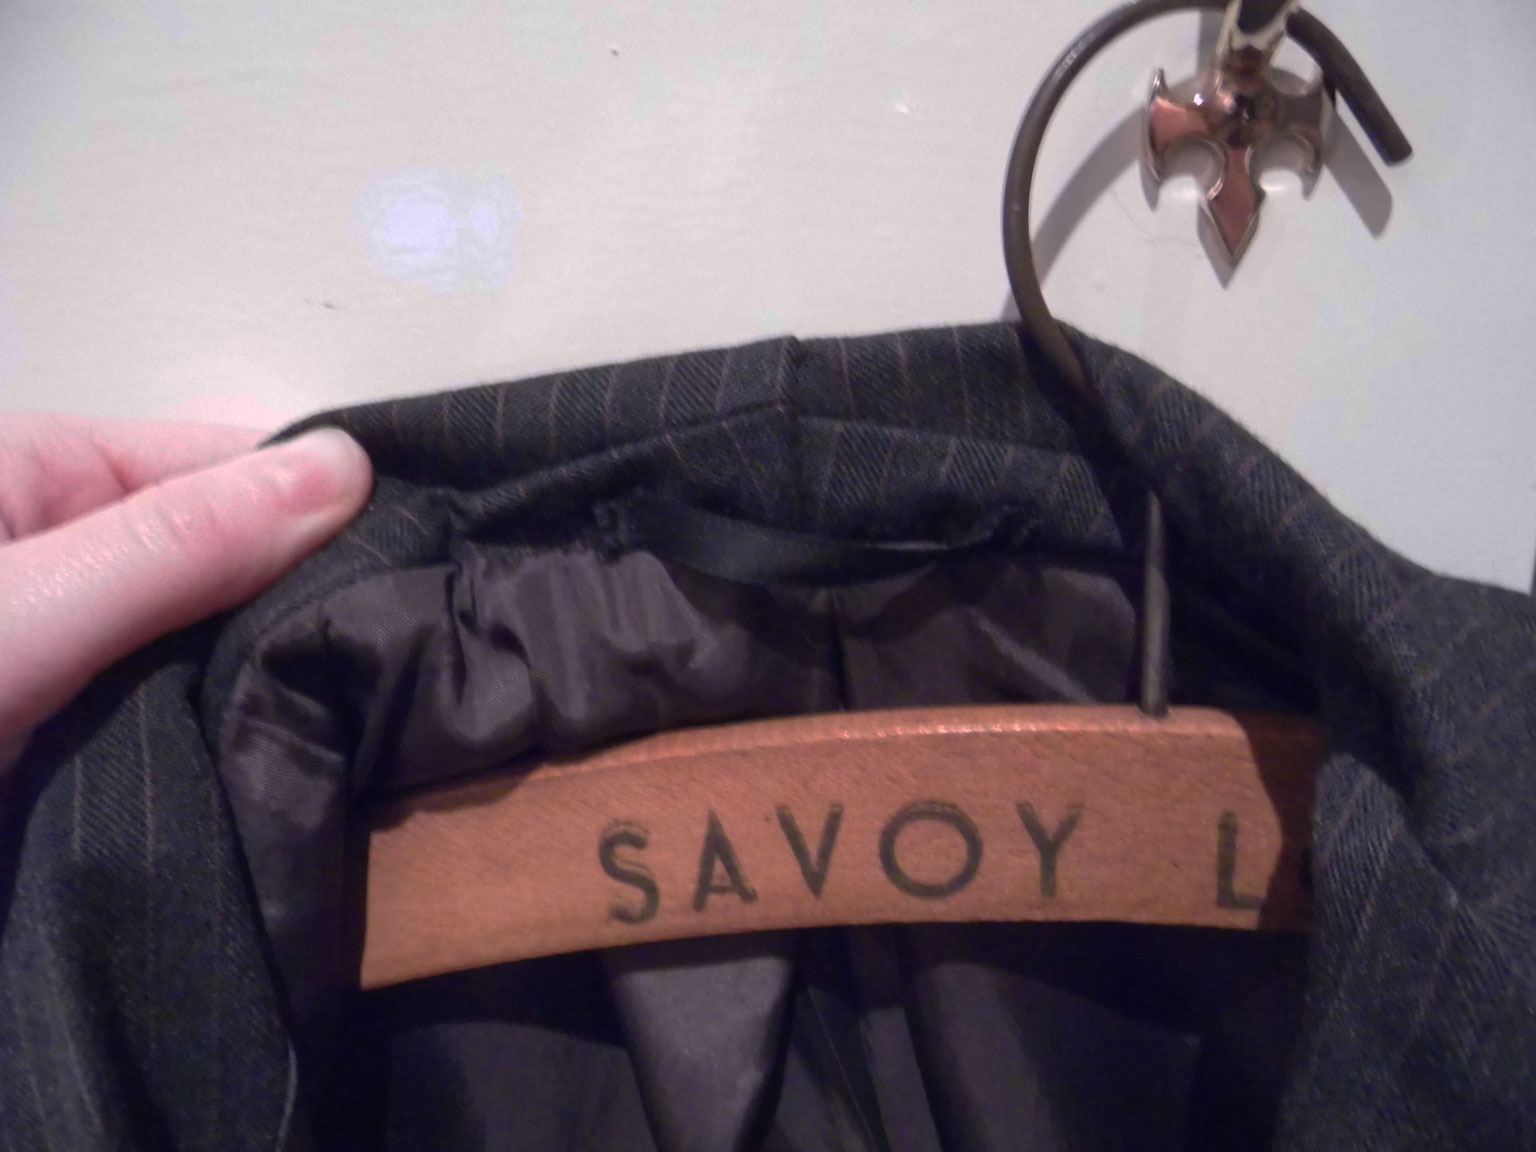
I even managed to reuse the same hook for the back of the jacket. And this is the original hanger the suit was on – I assume my Dad stole it at some point! 🙂

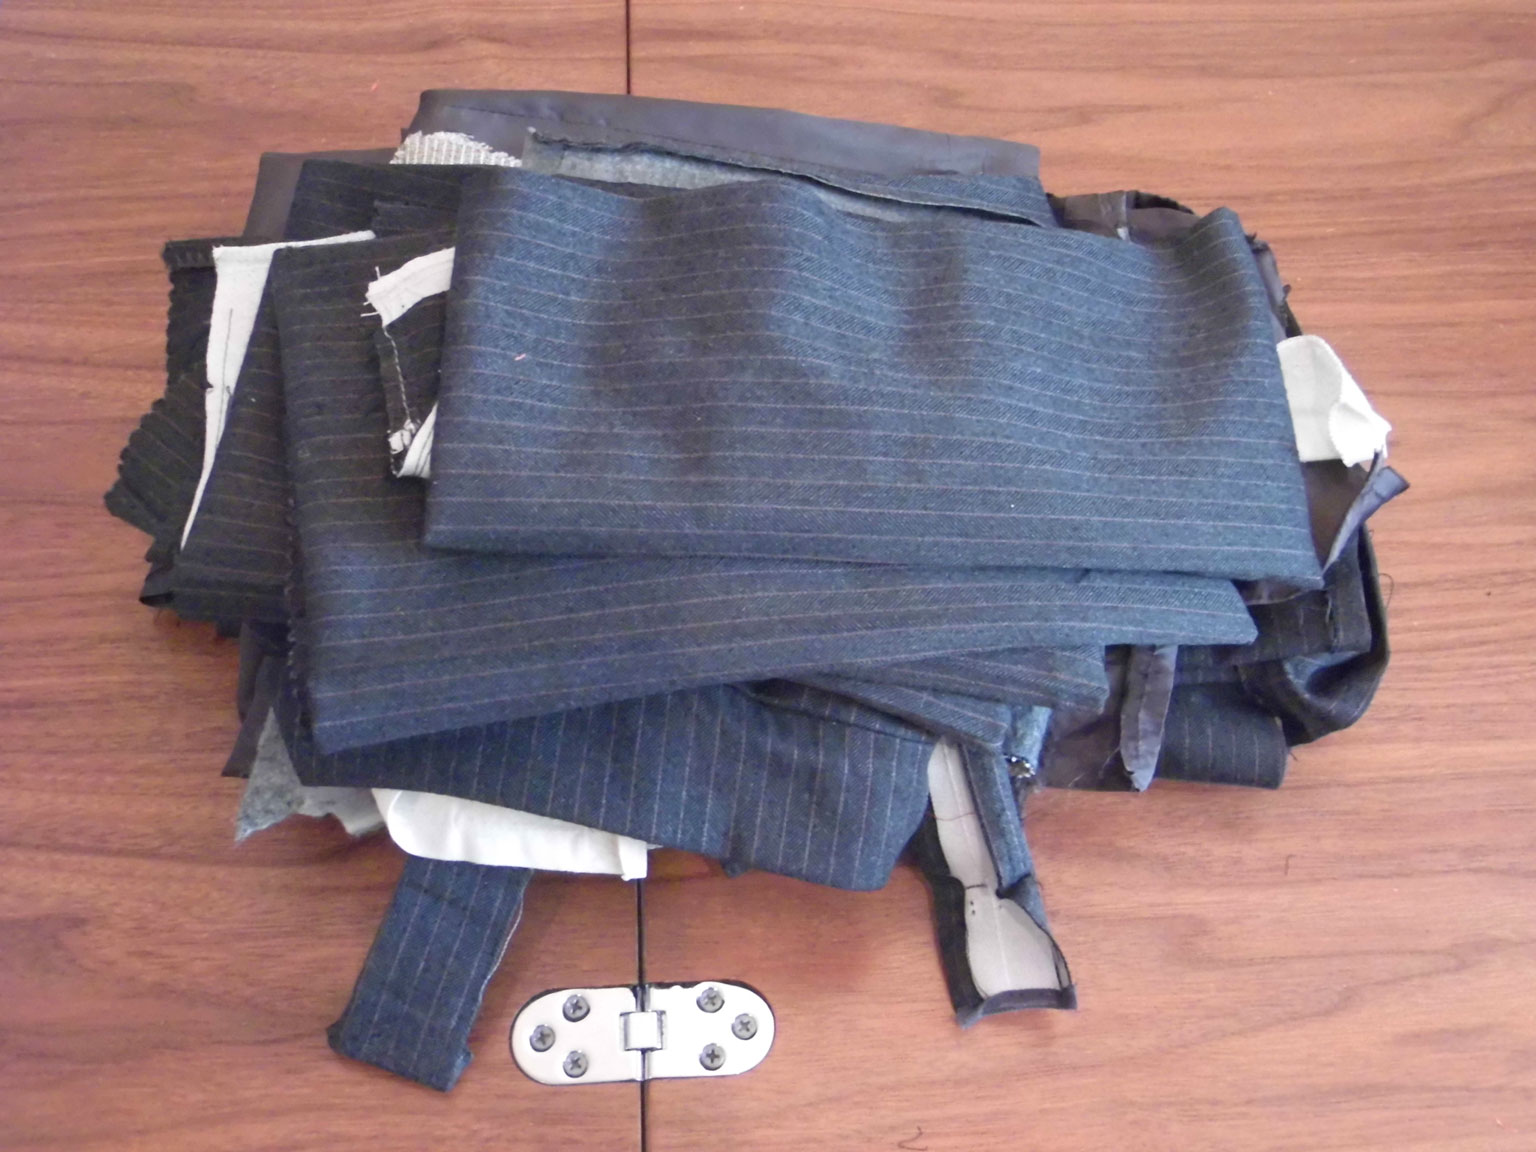
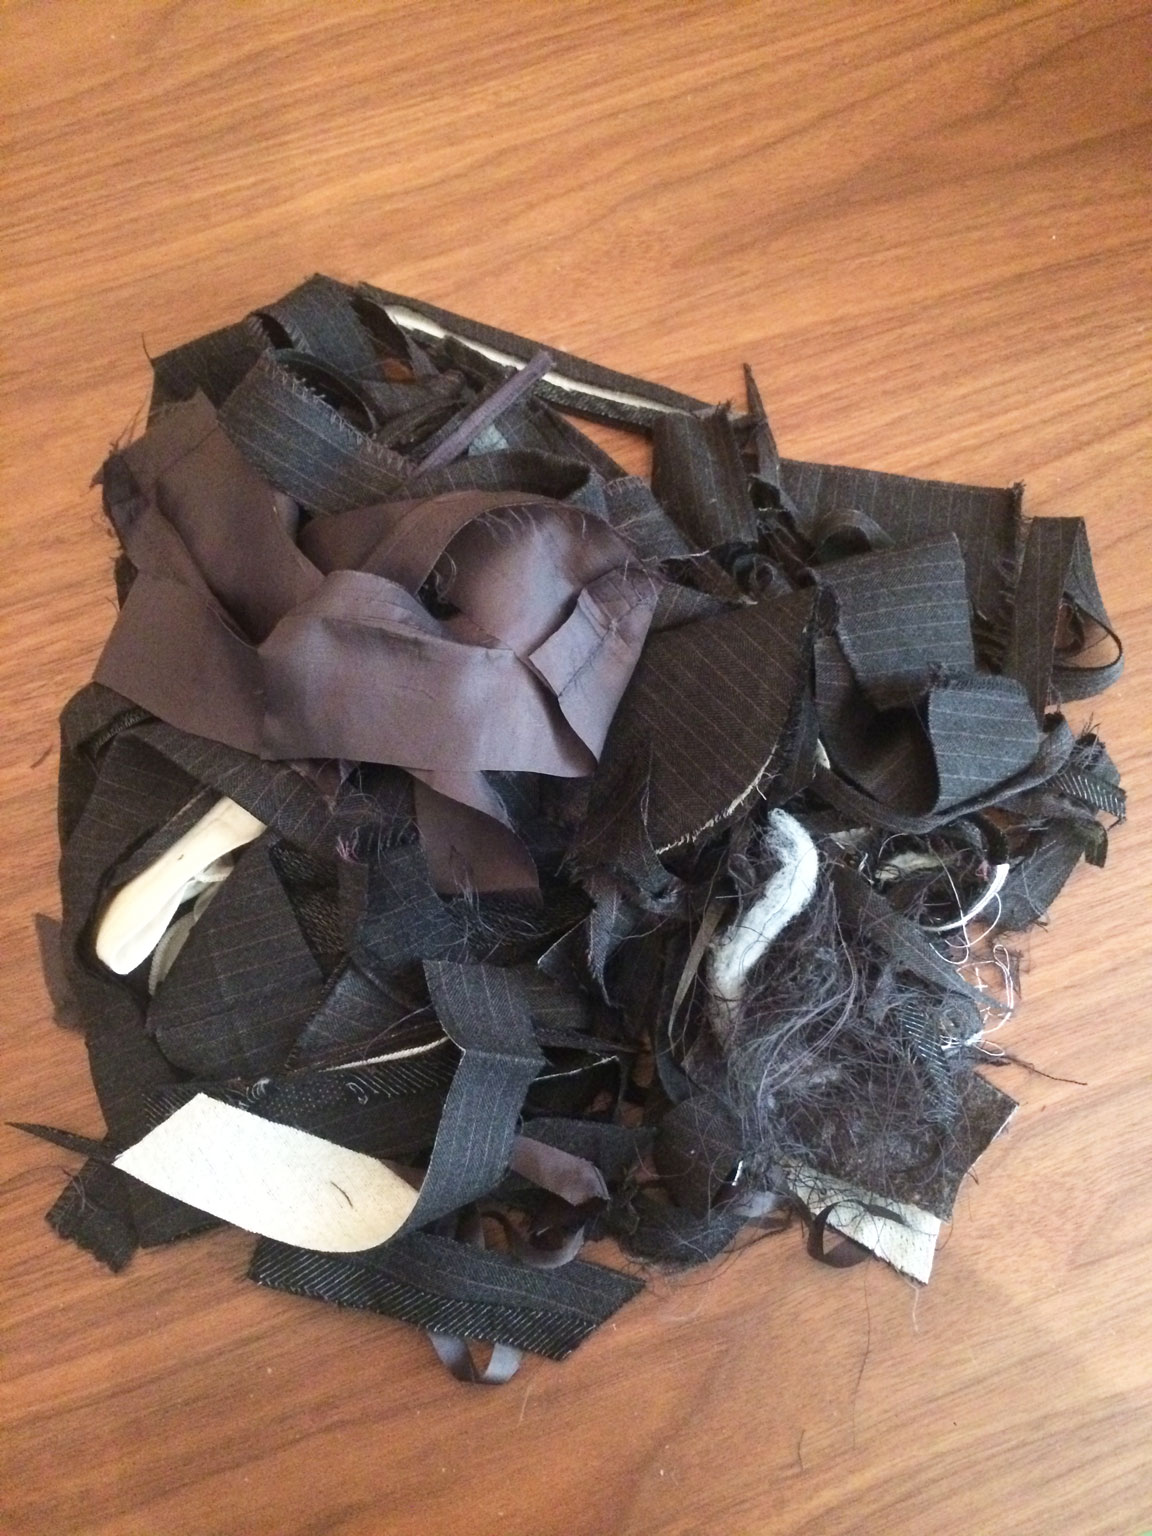
These are all the scraps I have left over after all of the changes I made. It doesn’t look like too much, but I will try to use these up at some point to make the refashion a little lest wasteful. No idea what I’ll use them for, though!

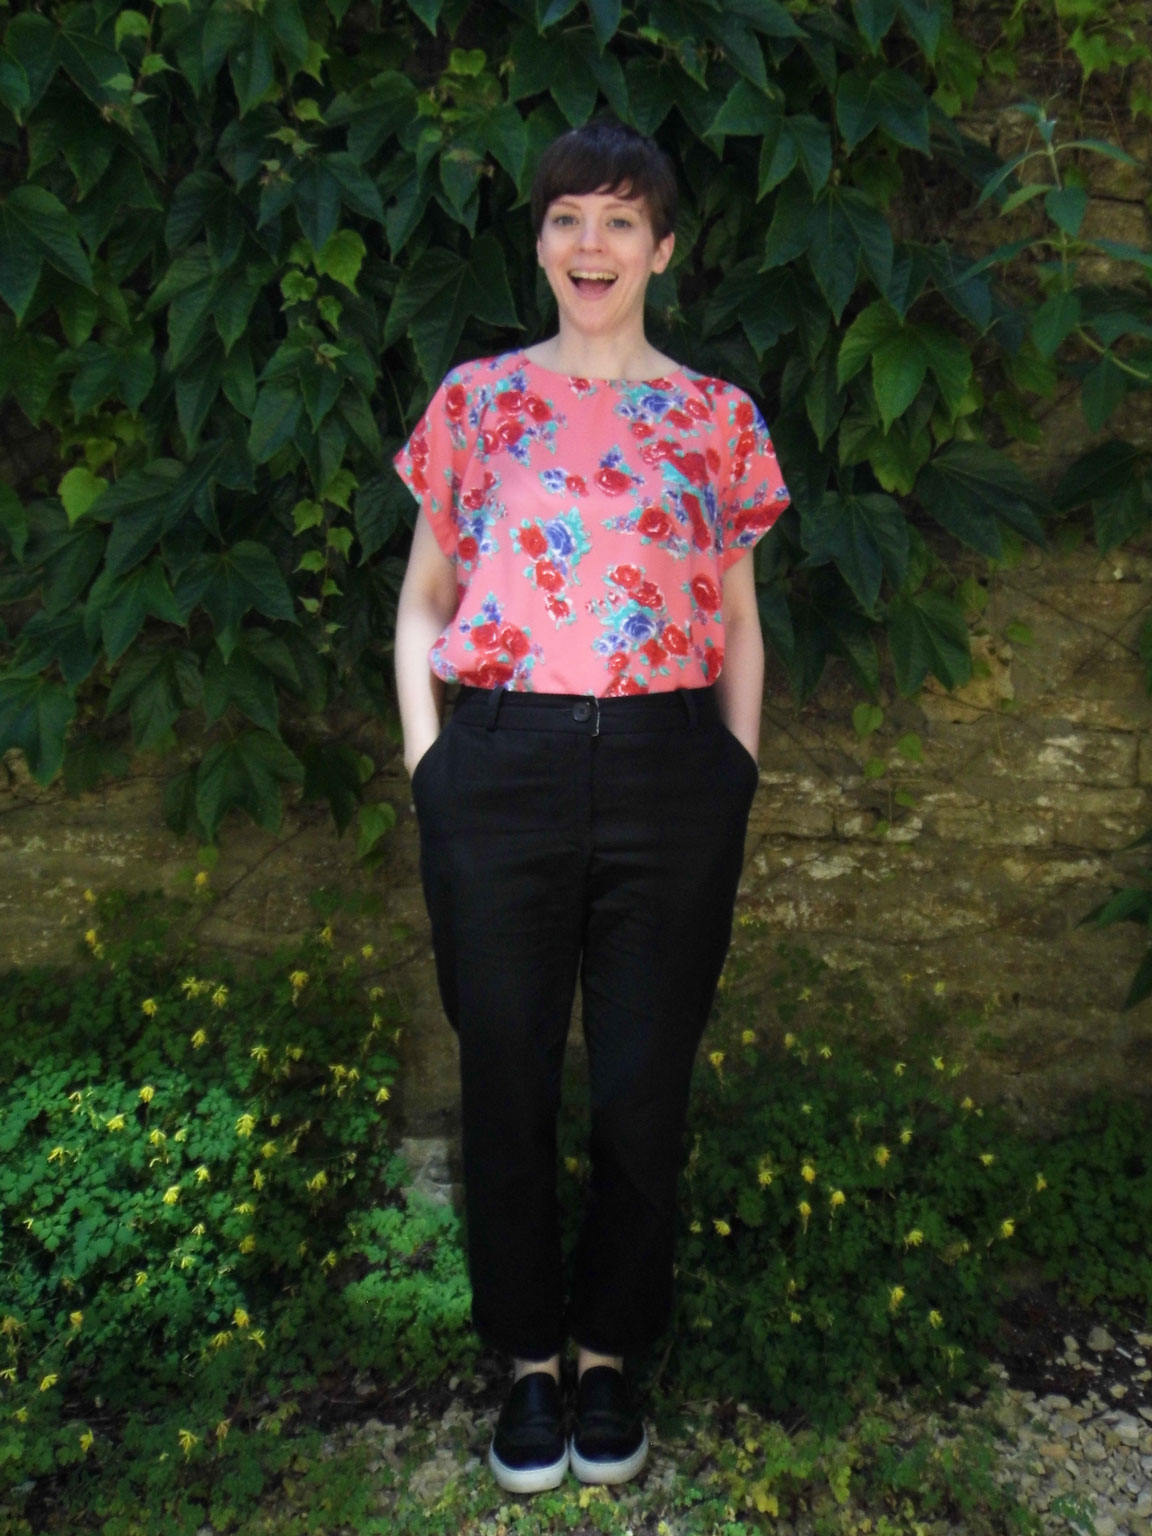
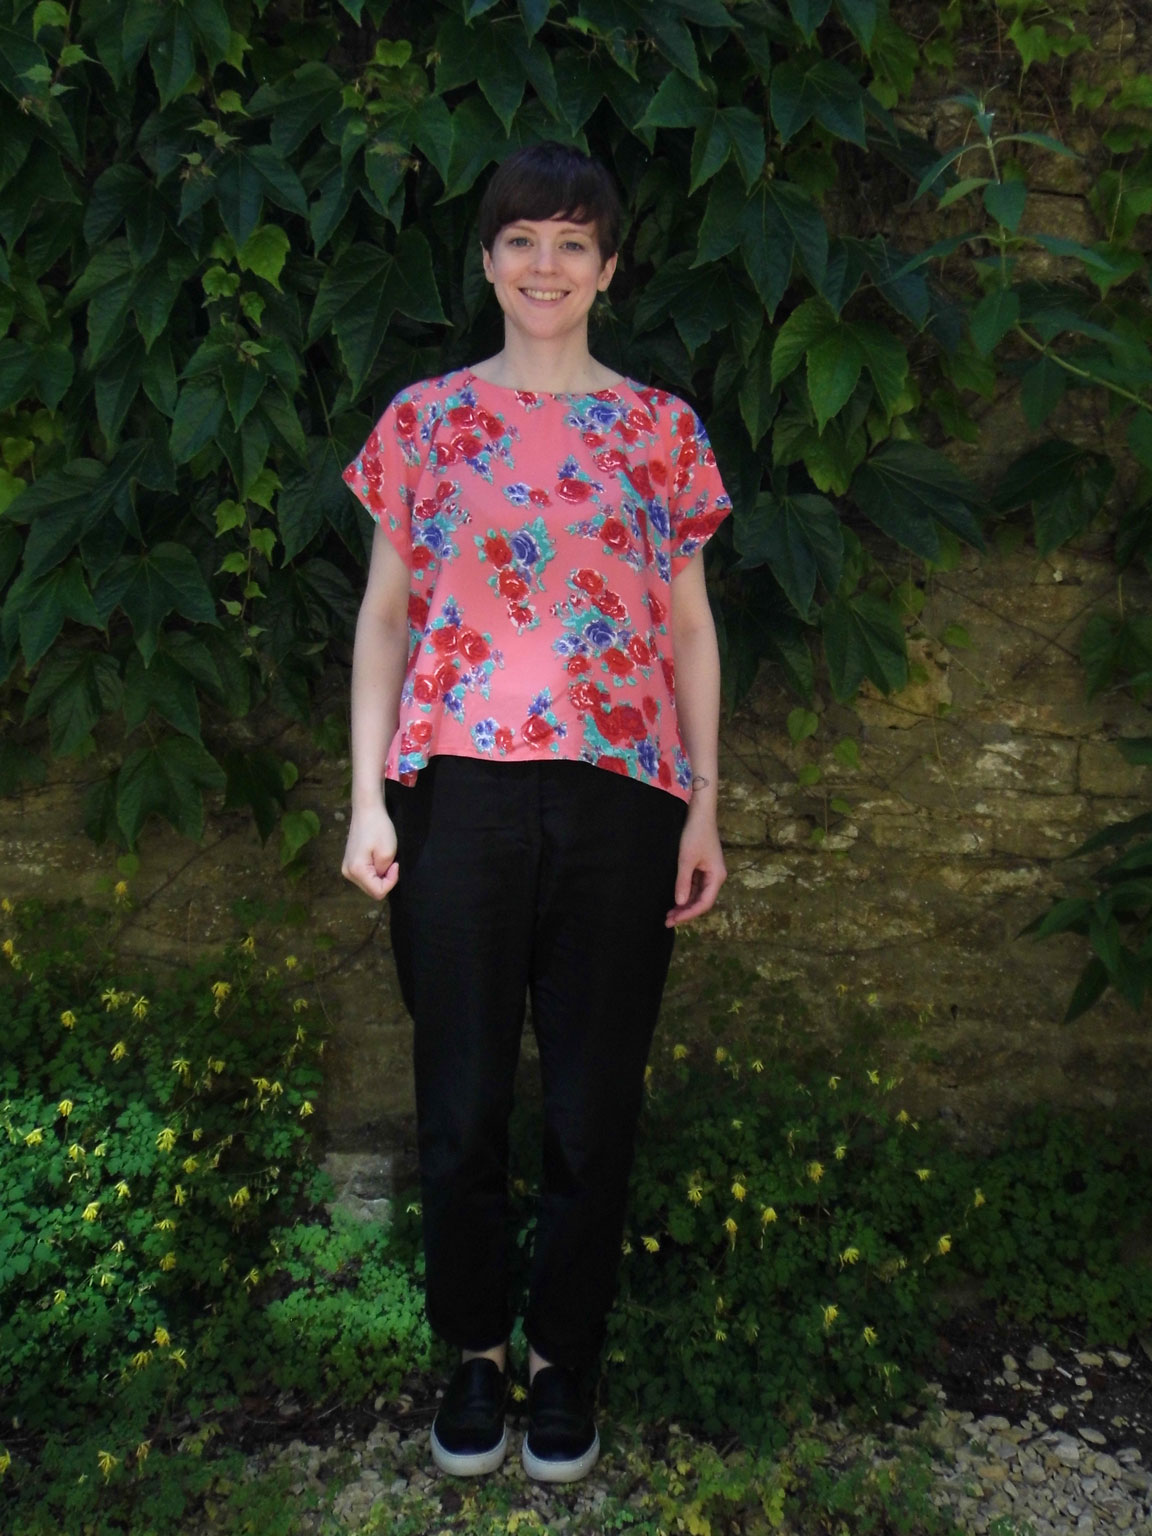
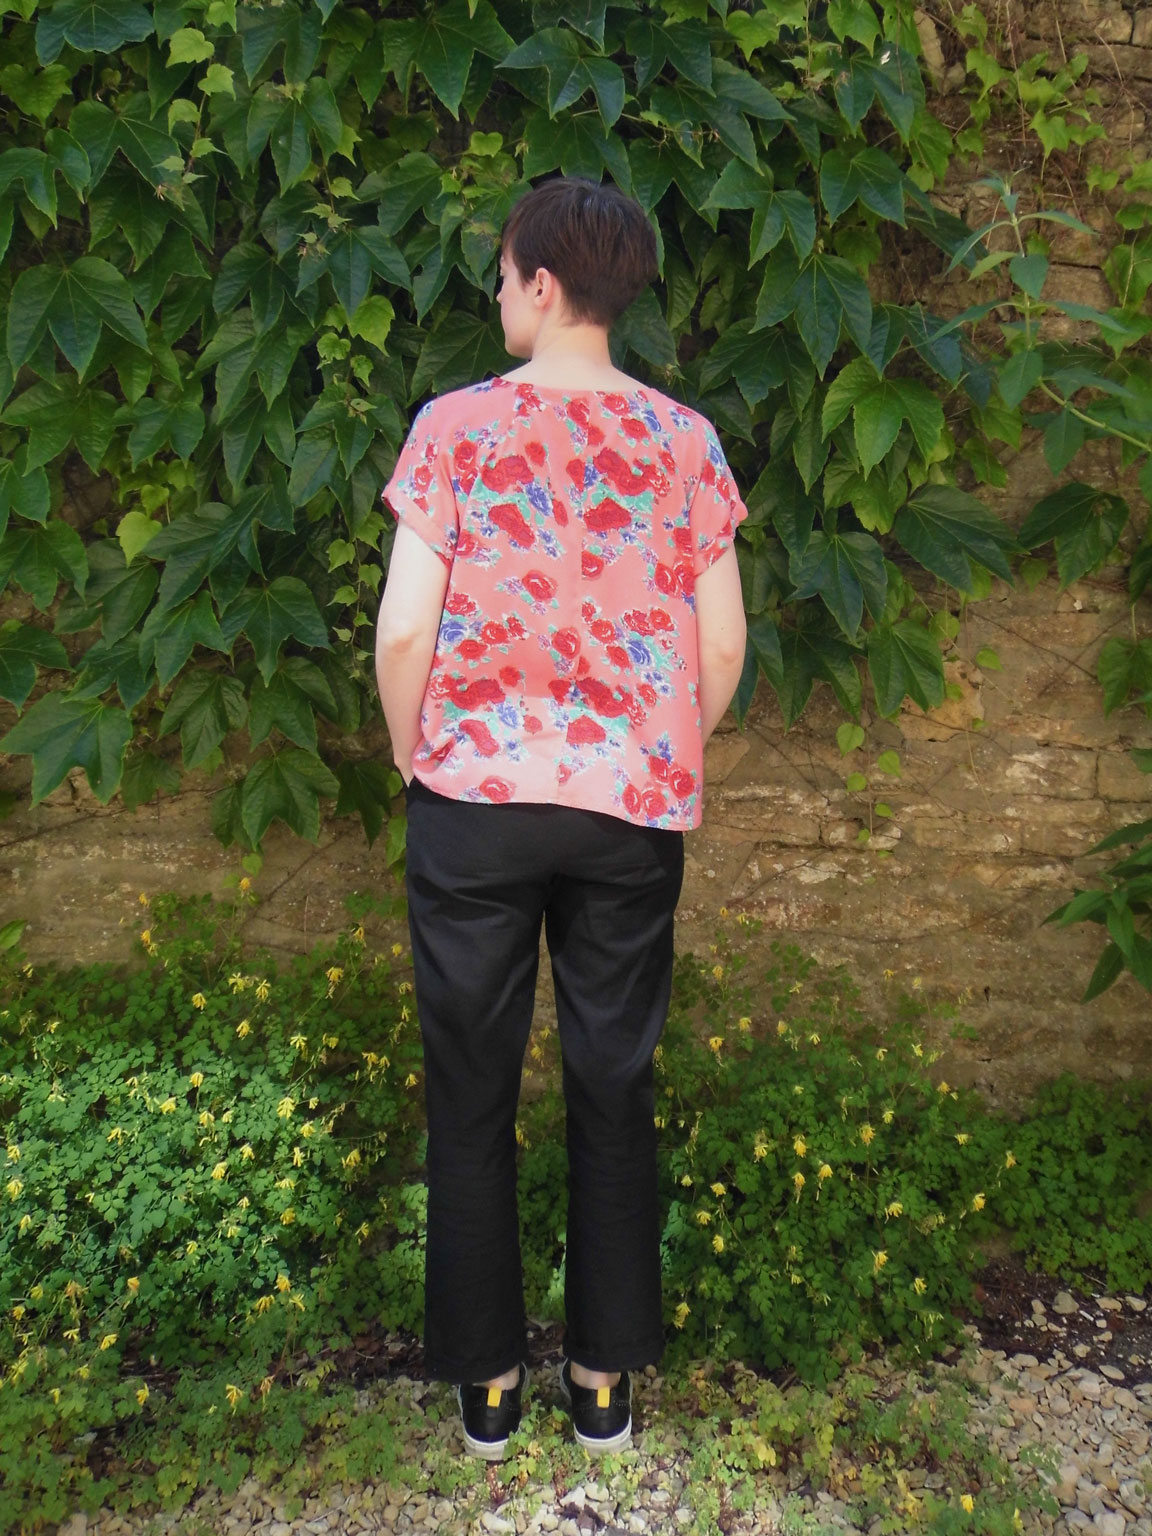
I definitely want to have a go at a proper tailored jacket, from start to finish. Maybe I’ll see if there is an online course or something, so I’ll learn some tricks of the trade. I’m pretty please with how this turned out and I’ve already worn the trousers to work a couple of times. I think the jacket will be a nice warm layer now the weather is getting colder! I have some nice thick jumpers but most of my cardigans are pretty thin, so I think this jacket will see quite a lot of wears when it’s too cold for a cardigan, or over a jumper when it’s really cold.